- Home
- About Us
- Join/Renew
- Member Benefits
- Member Pages
- Log In
- Help
- Museum Store
I have long worried about how I was going to pull the rear drums on my ’35,forced on a shallow taper with a great big nut 79 years ago seemed like it would be a daunting challenge. Of course several months ago William Lyons posted his pics and description of his puller built from modified pipe flanges.
Bill, thanks for the inspired design!
Those strange 4 ears cast and machined into the rear drums originally would have had only one purpose I can see, to attach a special very heavy duty puller to. Trying to force the drum off using the wheel studs, or worse something pulling on the outer diameter like some cheezy drum pullers on the market looked like a good way to prang a nearly ir-replaceable drum, so Bill’s puller made all the sense. Somewhere out there is probably an original puller the shops used for this style of drum. Bill’s puller engages the ears right at the tapered shaft, so puts no force on the drum itself. If it doesn’t come off it will be because the ears sheared off, and they should be good for at least 50,000 lbs if loaded evenly. Being a novice machinest I cut a few corners on Bill’s design to reduce the amount of machining needed. I used a smaller pipe flange that puts the bolts in closer next to the ears instead of outside, this means the flange doesn’t have to be cut on the OD to clear the wheel studs, and regular 5/8 cap screws can be used without grinding them. Each cap screw can apply well over 30,000 lbs each=120,000 lbs of force before failing, so this thing can apply a lot more force and in the right place than conventional drum pullers. It is also much safer. With the axle nut re-installed flush to the shaft there is only about 1/4 inch of travel possible for the drum when it breaks free. The puller itself is trapped on the ears so everything is stable and nothing is going to come flying off when it finally lets go. Evenly torqueing 4 fine thread bolts provides dramatically more force than a typical puller. Worked like a charm! I’ve attached drawings and pictures.
Thanks again Bill, hope I haven’t infringed a patent!
Jim
Jim,
Very elegant revision. I will include you and your print in my patent pending application. I am glad you experience the same ease of removal. I think the closer to the center of the axle you can get the more efficient the puller becomes.
Nice job, glad you got one of those “dreaded”” jobs behind you.
Bill”
I forgot, you can’t underestimate the safety factor
Looks like an easier and safer way to pull the drums.
I almost wish my ’29 had the same style drums so I didn’t have to use the 3 legged dog-bone puller.
I bet there are quite a few members that would like to have one of those.
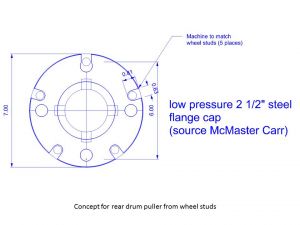
Craig, one can imagine the rear drums were modified to incorporate the 4 ears because the repair shops were having the same problem pulling drums way back when. Like others have reported, when my drums came off the tapers looked as clean as the day they were assembled, corrosion wasn’t the issue keeping them stuck on. At any rate, it seems like if you don’t have the option of the 4 ears, the next best alternative is pull the drums from the wheel studs, and the best hope of doing that without pranging the drum is pull on all five studs evenly and progressively. A thought for doing it with the same idea of the pipe flange caps is machine a larger flange cap with five slots to match the 5 wheel studs, see attached drawing. The flange cap comes with 4 pre-drilled holes but of course 4 holes don’t line up with 5 wheel studs. Then get 5 coupling nuts and bolts. the coupling nuts would screw onto the wheel studs. I believe 1/2-20 fine thread is what my ’35’s are, and I confirmed 1/2-20 coupling nuts are available from McMaster Carr. I think such a puller would have very good stability and not come flying off as long as the axle nut is on the axle flush with the end of the shaft (leaves ~1/4″ movement for the drum when it pops off the taper).
One of the worries is that this arrangement is probably a lot stronger than the drum itself and capable of breaking the studs or drum long before the puller fails.
I only know my ’35’s dimensions, other models likely have different wheel studs and dimensions, so don’t take my little sketch verbatim.
Jim

Hi Craig,
I’m assuming your 29 axle is like all the others I have seen. If that’s the case you’ll want to pull the drum by the threaded center of the the drum i.e. where the hub cap screws on wood wheel cars. Hub pullers are available at swap meets, Ebay etc. Most are not very robust. If memory serves the size is 3&1/4 inches.
A better option might be to buy newly made one from George McMurtry in Nebraska. George will build a puller for any old car hub. His phone is 308 586 1930. His email is [email protected].
Happy Motoring,
Rick
Thanks for the suggestions.
I may have to make a wheel stud version of James’ puller since I don’t care much for pulling on the studs the way my current puller does.
It was quite an endeavor when I pulled the rear drums a few years ago to change out the axle seals.
The drums sure pop with a bang when they let go and my axle shafts showed no signs of corrosion, either so it was just 70+ years of being stuck on there.
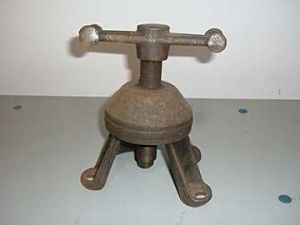
The puller I have is very much like this one but mine doesn’t have such nice patina. 

We had a similar puller on a drum tightened down to the max for about 10 days. We were working in the shop when we heard a big bang and crash……. it went about 6 feet across the floor when it let go. Word to the wise, if the puller makes you remove the nut off the shaft be sure to not get hurt by a flying drum. Ed.
If as Rick notes you have threads on the end of the drum, that could make for another variation on the pipe flange idea that would not require pulling on the studs. An unthreaded pipe flange could be machined and threaded to screw directly onto the drum hub center thread, then another matching flange cap placed on the axle+axle nut and four bolts put through the four holes in the flanges. Actually less machining, except for the inside thread part that is beyond my (low) skill level. Keeping the axle nut on means everything is trapped and nothing will come flying off. Didn’t know anyone was in the business of building new pullers, sounds like a good place to start.
Jim
As we suspected, there was a commercially available puller. Link is to a ’35 Snapon Ad.
http://www.collectingsnapon.com/catalogs/catalogs-small/1935_Catalog_KA/1935-Catalog-KA-p76.jpg
Bill, interesting. Noted the pullers for 31-32 Pierce for the “specialized shop”!
Just had more fun with rear wheel bearings. After inspecting the rear differential which was a thing of beauty and a joy forever, thought I might get by with good rear axle bearings. No such luck, so had to pull them. After looking through PASB’s apparently some of you guys can punch out roller bearing cups banging away at a 45 degree angle (or I am missing something). At any rate I’m not that good and prone to pounding on my hand instead of the punch, so I ended up grinding the legs down of a small 3-leg puller and used it inside out and backwards to grab the bearing cup at the three machined indents in the hub. Seems like there should be an adaptable puller out there for this, but I couldn’t find one.
Using a bearing punch makes it easier. Jim
James,
Here is how I am pulling the front seal on the ’33. I use a carriage bolt and grind off the head to make an L that I can fit between the shaft and the edge of the bearing. Turn it 90 degrees so it is under the lip and attach to a bar. Mark the top of the bolt so you know where the small leg of the L is in relation to the race. There is a carriage bolt in the foreground of the pic.
I have the bevel gear out and it looks pretty good. The worm gear is not in as good shape with some chipping on the face. Anyone have a spare?
Here is the bronze bull gear
Here is a close-up of the tooth pattern. Wear appears minimal as the width of the teeth are pretty uniform. I am afraid I will have to take the gear assembly apart to get to the internal spider gears for inspection.
Bill, your carriage bolt scheme would have worked on my bearing cups, good idea, will keep it in mind for the challenges to come!
I feel your pain (sorry for the cliché!) finding the pits in your worm pinion. I was holding my breath when I drained my ’35 and was lucky that oil came out and no water. After pulling the cover the teeth all looked beautiful, so I really lucked out there.
Replacing the rear axle bearings wasn’t without challenge however. Kept making new shims to add as I seemingly couldn’t get any axial clearance when I bolted up the left side. Finally realized the axle housing land must not be quite square and it was binding the bearing whenever the bearing housing was tightened up. My ’35 had about 60,000 miles on it and it was the bearing cup that was being pre-loaded in that direction that had failed. The preload also coincided with the side reacting the weight of the car, so that is probably what caused the premature failure. Maybe was the final straw that caused it to be parked in 1948.
Hope you have good luck with Bob Jacobsen’s worm assembly!
Jim
