Spent some time this weekend cleaning underneath and now am planning to relube everything. I do not see any Alemites nor do I see any oil holes which indicate “oil here””. How is the linkage to be lubricated? Just a bit o’ oil here and there where it seems it would be useful?”
Randy
This a great topic and one I will be watching. I am not sure how to adjust the brakes on the Series 80. I hope to learn that on this thread also.
Ken
Hi Randy, that’s pretty much it, just put a drop of heavy oil on each pin and pivot, and in the ball/sockets of the equalizers.
There are two cross shafts that might need a little more work to lubricate, The front cross shaft is the one above the rear of the transmission, bolted to the frame cross member. it has bronze bushings in the 9:-10″ long central bearing casting. Sometimes there is a counter-sunk hole on the top of the casting and on the free-pivoting arms. using a small drill, about 1/16″-1/8″, clean out the holes if you can find and feel them. then put a few drops of oil in them, it will soak in.
The rear cross shaft is above the rear of the drive shaft, also bolted inside a cross member of the frame, follow the same procedure.
If I remember, I’ll look tomorrow at some of the cross shafts I have in the shop, to confirm that there is an oil hole on the castings.
If you think the cross shafts are too sticky with dried up grease, you can remove the arms and slide the shaft out, to clean and relubricate. But if they move with your finger pressure on the arms, they are fine.
If you found any of the pins in the turnbuckles to have worn flat spots, replace them, this will take up all the extra play in the linkage, and add up to a higher brake pedal, and more effective braking..
The Series 80 brake pedal is close to the gas pedal, and if your shoes are wide, you will find that it is easy to press on the gas pedal along with the brake pedal.. I keep my brakes adjusted up to keep the brake above the gas pedal. and I’ve trained myself to hit the steering column with my toe when I put my foot on the brake pedal, getting my foot as far to the left away from the gas pedal as I can.
Greg Long
Hi Ken, you do have your owner/opperator’s manual, right ? There is a discussion on adjusting the brakes in the manual.
For the rear brakes, there are two rods, about 20″ long, that end at the differential housing, they have either a large wing nut, or a lard hex nut, sometimes with a lock or jam nut. The big nut has a slightly rounded ‘diamond’ shop that matches the diamond shaped hole in the brake arm on the actuation rod to each brake backing plate.
You jack up the rear of the car, so the wheels turn, make sure you use jack stands if you are not using a lift.
Then using a friend to help push on the brake pedal, and see how much the rod pulls the lever before the brake shoes contact the drum..
You want minimal free play in the rod and lever, but you must not tighten them to the point that the brakes drag, the wheels and drums must spin freely. Sometimes you will hear a very slight contact or drag, if it dose not require a lot of muscle on the wheel to turn when you hear the rubbing, it is alright. The brake drums sometimes had some surface rust on the braking surfaces.
For the front brakes, using a large flat blade screwdriver, remove the two backing plates on each front wheel, at the bottom you will see a 1/2″ bolt and nut, this is a locking or pinch bolt. Loosen this nut, but don’t remove, you just need to back off the locking/pinching pressure.
Then, using your ‘Front brake Adjusting’ wrench from you Pierce tool kit, turn the large, 7/8″ nut on the end of the brake shoe apply-stud. they are normal threads, you adjust the stud/nut out until the shoe contacts the drum. the loosen it till the drum spins free. Do this al the way around.on the 4 adjustments on the front brakes. Then have your assistant gently apply the brakes until they are just starting to drag, make sure both front wheels start to get barking drag at the same time.. a little difference left and right is OK, but if one wheel is locked when the other one is still spinning freely, then you must find the drawing cross shaft in the transmission case, and the pins in the turnbuckles, they must all be free, and not have excess wear or slop in the pin.
Hope this helps.
Greg Long
Hello Greg,
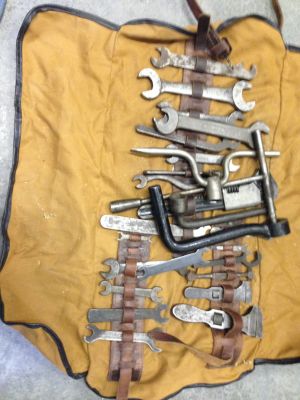
Thank you for the information. I do have an owners manual. I don’t have any Pierce Arrow Tools. Do you or anyone else have a picture of the Tool Sack that the tools would have come in? I did see one on eBay last week but not sure if it is the correct one.
Ken
Hi Ken, I’ll try to remember to take some photos and post them tomorrow.
Greg Long
Greg,
Thank you.
Ken
Ken,
Contact Karl Krouch about the Tool Roll.
He has them made and they are very nice.
You are correct that the bag offered on eBay is not correct for your Series 80.
Later today, if I remember, I will snap a photo of the tool roll and send it to you.
Peter
Ken,
BTW, the Owner’s Manual has the procedure for adjusting the brakes.
It is not difficult, but somewhat labor intensive the first time through.
The fronts are easy, but the rears require more concentration to get them correct because of the equalizer brackets.
If they are set up correctly now, but just in need of adjusting, they are a snap.
However, you will need a Front Brake Adjusting wrench.
Someone reproduced those years ago, but I DK who.
I will see if I have a spare.
Peter
That raises the question: what about the front adjuster wrench? As I don’t have one nor do I know if this is something I can get by without. Please advise!
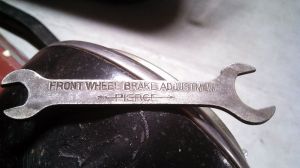
The front brake adjuster wrench is an open end wrench stamped from 1/8″ sheet steel, one end is 7/8″, the other 1/2″.
The thin stamped steel is needed because of tight clearance around the brake shoe adjusting sleeve/nut. A typical 7/8″ open end wrench is 3/16″, 1/4″, or 5/16′ thick, this thick of a wrench is nearly impossible to maneuver around the adjusting sleeve.
The photo shows one of at least two different versions of the stamped lettering on the wrenches I have.
Greg Long.

Thanks, Greg; I believe I can do that already. I have some thin wrenches.
I will be on the lookout for a genuine Pierce wrench though. If I had known I would have asked Karl at Hershey.
Randy and Ken,
The difference between the front brake wrench and a standard wrench, besides being thin, is that the end / bottom of the opening is rounded to accommodate the somewhat rounded brake adjuster.
It will be interesting to know if a standard ⅞-inch, thin, open end wrench will work for this application.
BTW Randy, you can always contact Karl via PAS email.
The wrenches are small and light, so postage will be inexpensive.
Peter
Thank you Peter and Greg for the info on the adjusting wrench.
Peter, if you do have an extra one send me an email.
Greg, it is nice to see it in a picture so I can get an idea of what it is.
Glad to know what to look for on the Tool Roll also.
Ken
Gents,
I compared the size of my thin, ⅞-inch, open ended wrench against the P-A wrench and the outer dimensions of the new wrench is much larger / wider than the P-A wrench and will likely bind because there is not that much space within the front brake cavity.
You could use it and see if it works and if not, you could grind down the outer diameter.
Or to keep it simple, you could just contact Karl Krouch and buy a real P-A Series 80 front brake adjusting wrench and pick up a tool roll while you are at it.
Cheers,
Peter

Peter,
Thank you for sharing your Tool Roll along with your tools. It is good to get an
eye on the items needed.
Ken