- Home
- About Us
- Join/Renew
- Member Benefits
- Member Pages
- Log In
- Help
- Museum Store
I am beginning to tackle the rubber parts on my car. Since the car has been outside since world war 2 the rubber is seriously damaged and harder than Chinese arithmetic.
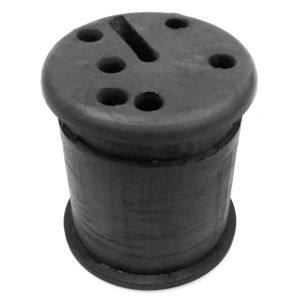
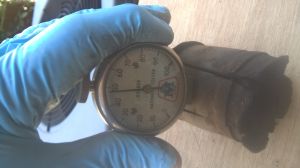
My objective was to see if I could get the rubber soft enough to use it as a pattern to cast new parts. I started with the plug in the center of the firewall on my 836. (see pic). I picked up a rubber hardness meter and got a reading of 50, which is like a solid rubber tire, I think.

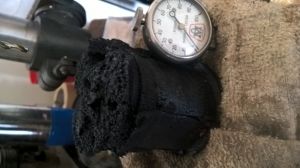
In contrast, here is my part

In order to soften it up to the point I could more it, I fired up the trusty Google and came up with a 2 parts xylene and 1 part methyl salicylate which is know as oil of Wintergreen and is supposedly available at Walmart and hobby stores. I couldn’t find any so I got some from Amazon.
I mixed them in a plastic food tub with a lid, put the part in and waited 3 days. One of the byproducts of the Methyl Salicylate is it makes your garage smell like an old locker room full of Bengay.
I took the part out and it had swollen significantly and the hardness reading was about 2. I set it out for a couple of days and it started to return to near original size and the hardness went up to 10.
My part was too far gone to salvage, but I have some other parts that have good detail but are too hard. I wouldn’t soak them, but I think I will try brushing the solution on a few coats at a time to control the softening.

I’m assuming you know that the wiring plug is available from Steele Rubber Products for about $95? And, you’re casting your own for the pleasure of doing it yourself?
Of course, there are other parts that might not be available. I’m fighting the good fight for rear vent window rubber on the mid-30’s sedans, not available and Steele says $20K for two molds, which they won’t do….
If you get good at casting, would love to replicate the factory front rubber mat that is in my ’31 phaeton, it’s really starting to show it’s age, and I don’t even know how to begin to cast, so my hat’s off to you!!
David,
One of the main reasons I do this is I love to learn and giving my credit card number to someone doesn’t forward that objective. When all else fails I can buy. I am working on some of the floor/mat rubber parts and I have the same issue as you. I will let you know where my experiments get me.
Oh, That is Steele’s part in the photo. I picked that part to start with for 2 reasons. 1. it was in the worst shape and 2 if I screwed it up I had a lifeline.
OK understood. Will watch your experiments with great expectations!
I have a front floor mat that was good 40 years ago when I bought the car, I’ve used it of course, and now, at 86 years old (the floor mat, not me!) it’s getting ragged.
If I even knew where to start, I would. Does reverse mold have to be metal? Can it be wood, much easier to work? Most of the pattern not complicated, except the word “PIERCE “” framed in the center…
And what compound to use? Good stuff…”
Bill,
Since you are doing yours now, what are the 6 holes and the slot for? 2 holes for the coil primary wires I know, is the slot for the temp gauge bulb to go through? Maybe it’s obvious but I don’t see the other wires on mine. Jim
Hi Bill,
Have to tell you that I had to shave a little off Steele’s part so it would fit thru hole in interior dash wall…
Bob
Yes, the slot is for the temperature gauge line. Another hole would be for vacuum line to windshield wipers, I believe. Don’t need a hole for the horn, as that goes through steering column. So, we’re down to 3 unknown holes!! Underdash wiring harness connects to a junction block located on bottom of firewall, driver side, so nothing there goes through firewall..talking 1934-35 cars here that I’m familiar with, maybe earlier too..
Looking at the wiring diagram, I think that you probably have a wire to the coil, one to the Startex, one to the Generator relay and one to the AMP gauge, but since I have none of those, it is only a guess.
One of the holes would be for the oil pressure line.
Thanks Jim, Bob, David and William.
Ok so we have.
1. Temp gauge
2. Oil Pressure Gauge
3. Amp Gauge
4. Vacuum line
5. Coil
6. Startex
7. Generator relay
Does anyone know if that is correct? and if so which goes where?
On mine it is
1-temp gauge
2- oil pressure
3-vacuum for wipers
4-distributor advance
5-choke
6- coil wire
Startex and generator do not pass through the grommet
Well on my 1930 the oil line goes through a bulkhead fitting in the firewall, I don’t have a startex, amp gauge comes up in the flexible conduit left of the clutch pedal along with the generator relay, vac line has a separate line at the right side of the firewall.
I had no rubber plug in the firewall at all and I can only find 3 things that go through there, 2 coil wires and the temp sensor. Is there something else before I finish the wiring harness? Jim
Jims,
Good feedback. Since mine is a ’33, it has an automatic choke and advance via a lever on the column.
Bill
Correction on my wire totals, there is only the one coil primary, wire it branches off on the engine side of the firewall to each coil. So that leaves 5 holes I don’t know what goes through them. Jim
While on the subject of repro rubber, I had bought the repro piece that fits through the column, brake, and clutch pedal shafts at the toe board from Steele. It didn’t fit my ’35, I think they may say the same part fits ’33-’35, so maybe what they copied was from a ’33 that is different?
Fortunately my original – with Pierce and the part number molded in – was useable if not like new.
Also, the repro’s for this piece and the gearshift/parking brake grommet don’t have the soft metal plate of the original, so a metal piece needs to be fabricated to bond to the back side of these.
Jim
Bill,
Did you have all of the holes with wires or the temp sender in them? No vacant holes? Jim
Jim,
If you were directing the last question to me, I have no idea as I had nothing but the oil line in mine. Everything else was missing.
Bill
