- Home
- About Us
- Join/Renew
- Member Benefits
- Member Pages
- Log In
- Help
- Museum Store
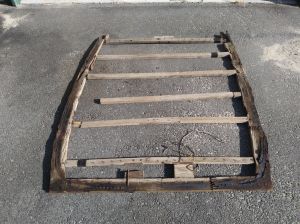
I removed the decayed top bows and “picture frame”” wood out of my ’35 sedan and laid them out to start figuring out how to shape the replacements. It reminded me of some old fossil washed up on a beach.
Jim”

Jim,
Is it all solid wood? I found some laminated sections on mine. Good luck with those finger joints. They have always intrigued me.
You may want to look into Smith’s CPES. It is what I am using on my mahogany 1946 Century dual cockpit boat. Maybe you can save a few pieces.
Bill
This is interesting! Can you post more photos of your work?
Most of the wood in my sedan is still good but some bits like this aren’t. There is too much rot in the picture frame to fix, and some time in the distant past I think a couple of bows must have been replaced and they cut through the right longeron in two places to remove them. They put the piece back in place and spliced the resulting butt joints with wimpy perforated steel straps with only one screw on one side. Not the best structure! Actually I would like to know how they managed such a clean straight cut with the wood in place! I use a Dremel multi tool to make straight plunge cuts like that.
The finger joints of course are all bad and and there are a lot of them. I think that was done to avoid wasting a lot of wood cutting out the three dimension curve shapes from long straight boards. Years ago my father advised me that finger joints need really excellent tooling to make good structural joints, and probably can’t get there on a one-off hobby level with all the 3 dimensional angles they are cut too on these curved bodies. I plan to use long thick boards (ash) and not break and join them along the length at all. Less complicated and clearly better structure. Function over form.
When I get the new ones cut out I’ll post some pictures – might be awhile!
Jim
Forgot to mention Bill, these pieces don’t have any laminations, they are solid pieces finger or lap jointed. There are a couple spots where there is a tongue in groove joint to add width locally.
I have been using Smiths epoxy rotten wood replacement resin in places where the rot is localized. The stuff is a bit challenging as it takes a week to cure and is so thin that it just drains through any leak path, so I have to be ready with drop cloths to catch leaks that can end up coming out a foot or more from where it is applied, even after sealng the area as best as I can.
Jim
