- Home
- About Us
- Join/Renew
- Member Benefits
- Member Pages
- Log In
- Help
- Museum Store
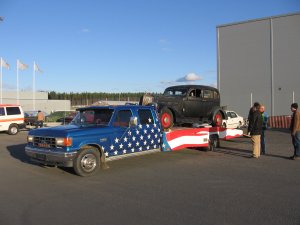
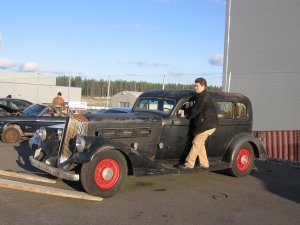
OK , here it is! 

The next thing is to little bit “research” the car and what’s included with it. Seems like some screws for chrome trim is missing(most of the chrome was in back seat), trunk rack, rear bumper etc.
Then I’m going to get the engine running:
1) little oil from spark plug holes
2) clean the gas tank
3) Replace the old oil filter
4) check the “oil cooler”, any hints on this?
5) change all the fluids ( What kind of oil should I use?)
7) repair the fuel pump
 repair the water pump ? (is this a “weak point” after long storage in these cars? atleast in mopars it is)
9) change gaskets to carburetor
After this, I will start working on wheels (bearings) and brakes.
If you guys have any “last tips” that I should be aware of, let me know!
Thanks

One picture more..

Mika,
If you have not already done so, the FIRST thing you should do is contact the PAS library and get copies of the Owners manual and Parts manual for your car, very helpful. You may also want to drop the oil pan to clean it and check out the internal condition of the engine.
Don, I think that might be a good idea!
I found a place that sells gaskets, so I might order an oil pan gasket too.
Water pump gasket might be easiest to do from correct gasket material?
Oh, does anyone have any ideas what kind of wood(and how it is handled) they used in the body?
It looks like I will have to be a carpenter too..
Hello Mika,
I am glad to hear that your Pierce Arrow has arrived! Dropping the pan and cleaning out the old oil and sludge is an excellent idea. This will give you a chance to check how the bearings fit in the lower end of the engine.
As we discussed before, I would be very careful in working on the fuel system, especially on a car that has been stored for a long time. Make sure that there is no rust, dirt, deposits, or varnish in the tank, fuel lines, fuel pump, and carburetor. You may want to look at using a tank sealant if you find surface rust inside. Once you have the fuel system clean, it would be good to get a fuel filter in the line to keep it that way. Few things are more annoying than getting an engine running, then having rust flakes or crud clog the jets in the carburetor!
You will probably have to make your own water pump gaskets from gasket material from the car parts store. They are fairly simple and easy to cut out. These water pumps are pretty simple and if the vanes of the impeller are intact and not rusted away, they will move a lot of water. Perhaps the biggest problem is keeping a seal where the shaft exits the pump. The shaft tends to get worn and grooves which wear away the packing material. Then no matter how tight you try to tighten the packing nut, it will still leak coolant around the shaft. You can try fitting new packing material, but if the shaft is worn or damaged, the best thing to do is to have a machinist install a bearing and a modern seal and fit a new shaft if you have a leak in this area.
The main thing to check with the oil temperature regulator is 1). that it is not leaking coolant to the outside of the engine, and 2). that it is not leaking oil into the coolant (or coolant into the oil). As this is essentially a heat exchanger, leaks in the core can allow oil under pressure to leak into the cooling system. You will notice this if you see an oil film floating in your coolant when you open the radiator cap.
Body wood in a Pierce Arrow is Northern White Ash.
It looks like you’ll want to check the engine side cover for coolant leaks. One thing to be aware of, especially on an engine that has been sitting for a long time is that the cooling system may also be full of dirt and rust flakes. These get circulated through the system and can clog the radiator, and obstruct flow through the water jackets…leading to overheating. This is another system where it is important to have it as clean as possible. If you get really adventuresome, you can remove the side plate and clean out all the rust flakes and dirt. New gaskets (and side plates, if necessary) are available from PAS Member Dave Murray.
Good luck with your Pierce. Let us know if we can be of further assistance with getting her running again!
Happy Motoring,
Chris
Hello Mika,
Adding to Chris Diekman’s advice on the cooling system, some of us put a temporary “filter” at the top end of the upper radiator hose before starting the engine the first time. You can cut about 8 inches of the foot of nylon pantyhose or similar material, insert the toe into the radiator inlet, leaving about an inch showing, which you wrap over the pipe before putting the hose back on. There are permanent filters available to install in the hose itself (cut into 2 sections and clamp the filter in) if you keep getting stuff out.
Also, I would think twice about removing the side plate unless you want to risk breaking off rusted attaching bolts and spending hours drilling them out. I tore down my ’33 and broke 6 bolts, and made a fixture to accurately drill the remains out. Still had to install 2 heli-coils for new threads in 2 holes. Then installed stainless steel bolts.
However, it is VERY important that the side plate (water jacket)have the internal baffle intact and not rusted out. The baffle is an internal plate that runs the entire length of the water jacket that forms a cavity that holds the water and shoots it through nine vertical slots through the spaces between the cylinders, and directs it to the valve seat areas, the hottest points in the engine. You can remove the oil cooler and look in the hole to see if at least the baffle is intact in that area. If not, get a new one or all the cool water will go to cylinder #4!
Also, if you ever have to rebuild the engine, my advice is not to install valve seats if not absolutely necessary for other reasons (cracks, etc.) Mine started popping out after 25 years. Big pain.
Good luck on your project!
Bob Jacobsen (’33 sedan, ’34 convertible)
Hi guys. Thanks for the replies! Good tips indeed!
Today I removed the Oil Cooler and tried to remove the water pump, but it seems to be “stuck” from the generator shaft. Time ran out, so I didn’t check if there was a “pin” or similar in the shaft (under the large brass nut)
I noticed that the engine was full of clean green pure antifreeze. No rust or any dirt came out from engine..
When I tried to look inside from the oil cooler hole, I saw only cylinders. Not any kind of plates..

Mika,
The end of the water pump shaft is square and it normally fits pretty tightly into the fitting with the flexible (canvas) disc. Put some solvent on the shaft where it engages the disc fitting and lightly pry the shaft with a suitable screwdriver taking care not to use too much force. I think you’ll be able to break it loose and separate the two parts in order to remove the water pump.
Bill
Bill,
thanks for the tip! I will try to get into this again this weekend. I would like to put a modern bearing to the water pump…
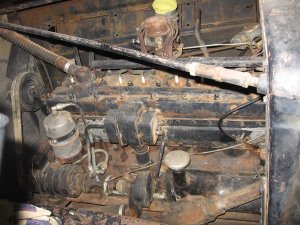
Here’s a better picture of the engine.
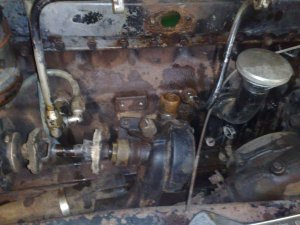
And here’s one after I removed oil filter, oil cooler and water pump. Also (as you can see, like Bob above warned) I managed to break one bolt from the side plate. All other bolts seem to be as rusted as the one I broke.
I was thinking that I could get some “cold spray”” or “”Ice spray”” and a mig-welding machine and weld bigger bolts to the old ones and when block and the bolt heats up I cool the bolt with the spray and try to unscrew it then. IF that doesn’t work … Then nothing works  Except drilling out the broken bolts from the block..
The side of the engine is looking “”wet”” because all of the “”rust remover(WD-40)”” spray i used to the bolts.
This is fun!
“
And the last photo showing the side plate .. that’s missing the “other plate”” inside the engine.
Mika,
Here’s an idea. You can use a hack saw to work your way from the water outlet hole to the ends of the water jacket plate. Your objective is to cut out the center section of the plate and expose the inside where you can get at the bolt ends with penetrating oil. You can also perhaps chip away at the rust before you use the penetrating oil. It’s painstaking work but it may save you from drilling some of the bolts.
Bill
Bill,
you mean like taking the plate apart by bits and pieces? Maybe that’s something worth considering. I just ordered KROIL aerosol that was recommended by Chris. I hope it does the trick. (atleast the manufacturer is quite optimistic about their product=money back quarantee  )
)
I just received an offer for new oil filter… $470… It would be show quality modernized oil filter for Pierce.
Anyone have any suggestions for temporary aftermarket filter which might work for now?
Also waiting for offer to new side plate for the engine.
Now I can take a deep breath and try to get the parts I need to Finland (takes about 2 weeks delivery) … So I hope to get that KROIL soon, so I can start oiling the screws !
Yes, that’s what I mean. You’ll need to get the Kroil (which is great stuff) on the inside part of the bolt threads and that’s the only way that I can think of. Applying a lot of force to the bolt heads will do one of three things and two are bad. At best the bolt will break loose and unthread. More likely the bolt head will snap off. The worst case would be for part of the block casting to break out around the bolt. This is NOT something to be rushed. Bolts are cheap but blocks are not.
Go slow!
Bill
Getting bolts loose: If you get a bit of movement, work each bolt back and forth just a few degrees, adding penetrating oil. Don’t try to unscrew more than a very few degrees without working it back towards ‘tight.’ The range of movement will slowly increase. PATIENCE!
Oil filter: Perhaps others who have used the Burr Ripley filter conversions can comment, but I think that is the way to go, since you will not have to re-form the existing lines or make new ones–which you’d have to do if you put a generic replaceable-element canister on. By the way, if your replate those oil lines, they should be polished nickel, not chrome.
George
Bill,
I think I could do that. Of course I need to have the replacement plate first, so I don’t cut anything that I cannot replace 
George,
You are absolutely right.And yes, I need to be patient. Wow, I hope I can manage that 
Maybe I have to go to the original-type-replacement-show $$ oil filter, I’m just not so anxious about putting “show” quality parts for the car I have just started to getting into life again… You know, it’s better to do then when you replace ALL the parts at once 
…meanwhile..
I’m waiting for some parts I ordered. Also got 2 cans of Kroil oil penetrating oil and I’m spraying the bolts every once in a while before trying to loose the water manifold bolts. I really seem to have patience! (never knew that before !!  )
)
Look what I spotted from Youtube! http://www.youtube.com/watch?v=nUMdsh4bO7Y
What a great looking car! 
I was just checking out the PAS Parts & Services list.
There seems to be National part #’s for powerbrake parts (rubber), but is there an online source for National parts available somewhere ? Since “contact your local supplier”” maybe quite a long shot in Finland 
Thanks!”
