- Home
- About Us
- Join/Renew
- Member Benefits
- Member Pages
- Log In
- Help
- Museum Store
Clum Switch for Headlight Pin or Wiring Diagram
Working on a 1930 Pierce Arrow Model A dual cowl and trying to get the lights working. Currently the parking lights come on with steering switch moved up to that position. But with that position also brings the running lights. The dim lights come on in dim, and high beam come on in high. Yet no tail light when in DIM or High Position. Stop lights work fine.
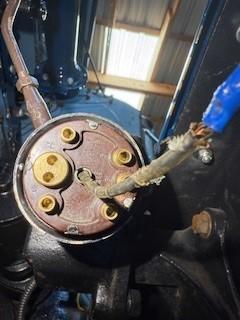
The clum switch (I think that is what it is called) is in pretty bad shape but we have a new fiber board that we will install when I get pin assignments sorted. I am thinking that the pins are in the wrong position but do not know the correct location. Wiring does not appear to have proper color codes as it has been replaced.
The fiber board has a larger two pin brass pin plug at “H”. Then it has a 1, 4, 5, 6, 8 pin locations. The horn wire which is a ground comes out the center and was going to the H larger connection. This has continuity as a ground.
Which pins got to which lights?

Arnold.
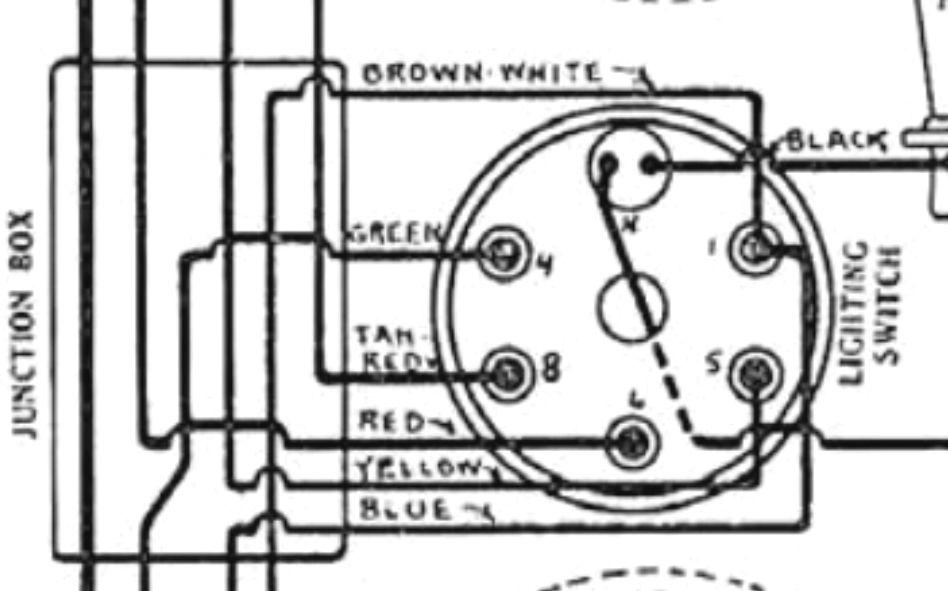
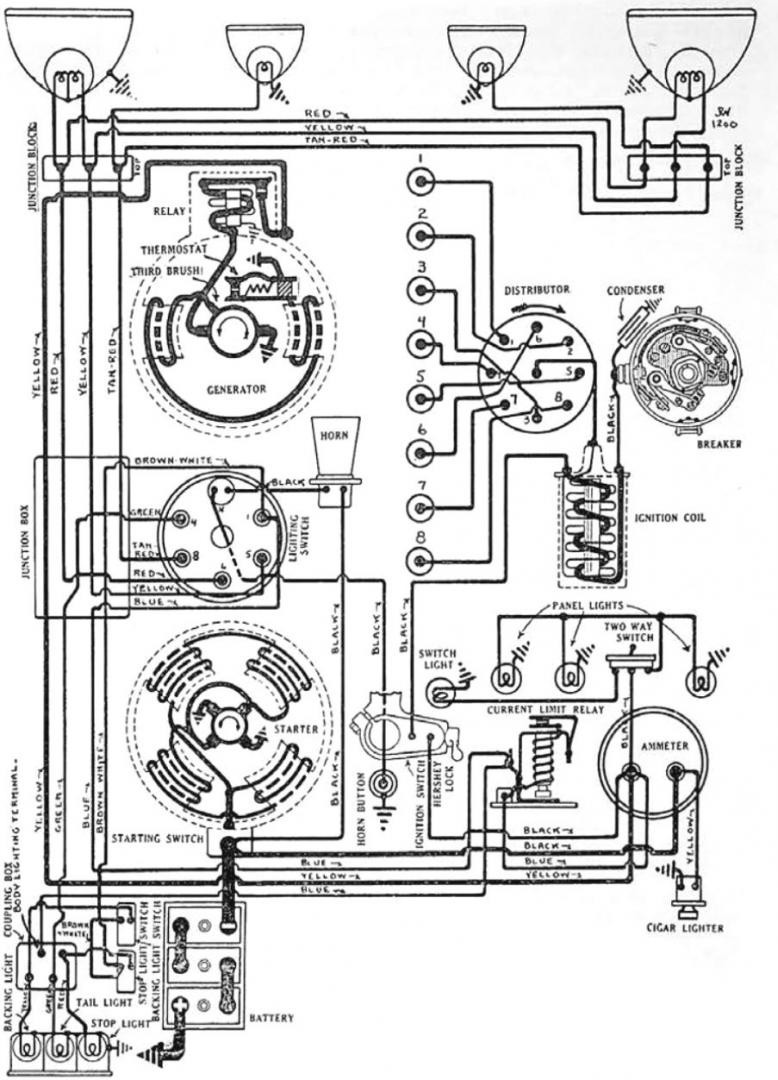
The Wiring and Tune up Guide has a wiring diagram including the Light Switch. If you want, you can download the guide from the PAS Website; Member Pages / Publications and Tech/ Operations and Service manuals. See below:
I hope this helps. I want a ride in the car at Eureka Springs.

1 -Stop Light Switch, Brown/White
and Current Limit Relay, Blue
4- Tail light, Green
5 – Headlight, Yellow
6 – Headlight , Red
8 – Parking Lights, Tan / Red
H – (Double)- Horn and Ground, Black

Arnold, The way I read the switch diagram in the wiring book from the Society, for your 1930:
Horn – this is the double post. Power goes to the horn on from a wire on the ammeter, so there is power into the horn all the time. There is a wire from the horn ground side to the second connection on the double post which connects to the hot side of the horn button and the other side of the button (as a switch) goes to ground.
Terminal 1: Power input and out to power stop and reverse switches on the transmission. This terminal has two wires for these functions. Power is fed from the Current Limiting Relay to the terminal and then to the backup and brake light switches in parallel. There is a power distribution plate above the fiber board you are going to replace
Term 4: Tail Light – this is a single wire from the light terminal to the lamp bulb. The other side of the bulb is grounded. (hint: check to see if there is a ground in the circuit; a bad ground will keep it from coming on – this happens on all old cars, not just Pierce). Consider adding a white ground wire from the backup light and tail light bulbs over to the stop light or better, to the frame of the car.
Term 5: Dim Headlights this is a wire from the switch to the junction bock for headlights (in a bad place to work on) the second wire on this block is the resister to the bright headlight function.
Term 6: Bright Headlights – this wire bypasses the headlight resister and goes directly to the bulb.
Term 8: Auxiliary Lights (on light bar of my ’29) (NOTE: If you plan to install turn signal into the auxiliary lights – running lights, install a 2 conductor wire from the lamp back to below the dash. One conductor will be cut and tied together at the switch. The other wire from each side will continue through the firewall and have enough extra to connect to the turn signal control box. Yes, harder to pull through the light bar, but much easier than it will be after assembly.)
Wish you all the best and see you in Arkansas this summer.
Herb
Thank you gentleman. This is Sam Wilson and I am responding for Arnold. I am just a friend and am helping him get this car buttoned up so he can bring it Eurecka. The diagram did help and we found two wires swapped. The little Bakelite plate is very finicky to get everything plugged in but after a couple hours fiddling with Arnold topside and me below we got it plugged in. Seems to work better, but for some reason now the tail lights are staying on. Even when lights are off. I suspect the little contacts inside the steering side of the switch are fouled?
After about 2 1/2 days working on it we got it running and went for a test drive and unfortunately the car idles fine and seems to run and accelerate fine stopped, but we found it has no power. Would not pull itself up a hill. Clutch is engaging fine, the engine just does not have enough power and is running roughly at mid accelerator.
We are relatively confident that the timing is good. Getting good spark and car had run and Arnold drive it in parade for 1 1/2 hours so no reason for it to have gotten out of time sitting for two years. I did clean the point contacts. So I suspect the gas is bad and the UUR Stromberg may have some passages clogged. Will go tear into that next.
But thank you for your assistance.
Sammy
Arnold & Sammy,
Look on the light switch and see if the power supply from the overcurrent relay is on TERMINAL 4 and not terminal #1. Easy to swap as they are mirror locations from each other. #1 goes to the tail lights and will be on all the time if it has a direct power to it, instead of going thru the switch. The other cause may be as you suspect – bad contacts or conductive crud on the bakelite piece holding the contacts in place.
As to the acceleration problem, if it has been sitting for 2 years, there is likely some water in the tank from normal atmospheric condensation. Back in the day before the gas stations put in the double wall tanks, we often had to use a drying agent to absorb the water (usually methanol) and it was readily available. Looks like STP still has this product and it may be worth a try before tearing into the carburetor. It makes sense it will idle well and accelerate with no load, as the fuel flow is pretty low. Trying to shove these heavy cars around takes a lot more flow and may have stirred up / mixed some of the water back into the gas. Try the water dispersant, add some fresh fuel, then drive it and see if that takes care of the problem. Much less labor than taking apart the carburetor. Herb
Herb,
They found a cracked fitting on the suction side of the fuel pump that was allowing air to be pulled into the fuel system. It showed up when they blew out the fuel lines.
Dave
