- Home
- About Us
- Join/Renew
- Member Benefits
- Member Pages
- Log In
- Help
- Museum Store
Last March, there was considerable discussion on how to make credible hood corners for the 1930’s Pierces. Conventional corners won’t work because of a tapered bead along the bottom of the hood. When visiting PAS member Peter Fawcett of Whitney, Ontario, he showed me his rather elegant solution for this common problem. I tried it on my 1930 model B and was pleased with the results, so I’m sharing it with the membership.
The enclosed photo shows a piece of .016†brass sheet bent to form the backing of the corner. Pierce used sheet steel which didn’t stand the test of time. The formed corner was covered with thin leather and rivited through the two 1/8†holes drilled diagonally on the four corners of the hood. If they have been filled in during a restoration, you’ll have to find them again. Forming the brass can be easily done using common hand tools and a bit of patience. About the only tool many members might not have is a Vice-Grip metal bending pliers which I found very useful. These can be found on Amazon for about $20.00, and are really handy to have in your tool box.
For the 1929-1931 models, about a 3 1/2†square of brass is needed. Other models might be different. Cut a square from one corner to make a tab which will be folded over the edge and rivited later, as seen in the photo. Make a 90*bend 2†down, then holding the bend tightly against a 3/8†bolt held vertically in a vice, bend the brass around the bolt about 120* to give you a 3/8†radius. Then take the piece to your hood, and holding the flat section tightly against the hood surface, wrap the brass around the bottom bead to match its contour. This thickness of brass will bend easily. Leave about 3/8†extra material to crimp under the bead after it’s covered with leather. All four corners will be different. I’ll post additional photos later.
Tom Barrett
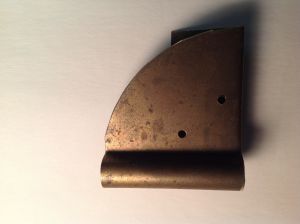
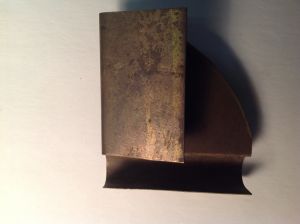
Here is another photo of the brass backing. On the left is a tab which will be bent over the back of the hood before riviring.
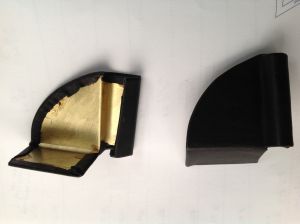
Here they are after covering with leather. I recommend using 2 oz leather which will form well without too much thickness. Contact cement brushed on both surfaces works well. Clamping along the 90* bend will give a nice crisp edge. Thin leather scraps are available on eBay for very little money.
Here is one attached to corner. Having a helper hold it in place, drill 1/8†holes through the original holes in your hood from behind through the front of the corner. Then fold under the tab, clamp it in place, and drill through from the front. Put two 1/8†plated split rivets through the holes, then crimp the bottom edge around the bottom bead of the hood. I covered the paint under the corners with a light coating of grease to stave off corrosion before final riveting.
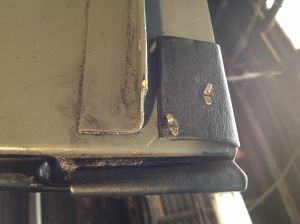
Here is the final photo. It takes a bit of time and patience, but the results should do the trick. Anyone having trouble finding .016†brass, let me know and I’ll send you some for postage. Good luck.
Tom
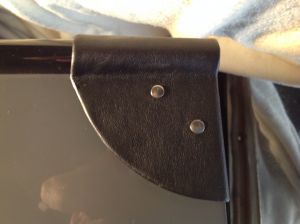
That looks great.
Thanks for sharing your process and taking the time to write it up.
Thank you Tom for your generous sharing. Seasons Greetings!
Thanks for shaking the cobwebs loose. I’ve been overthinking this off and on for a year, I have some sheet brass and never thought of using it for the backing.
Brilliant technique and looks great. Jim
Very nice solution to the problem and great write up, thanks for sharing. I tried to make some corners using just leather, was not overly pleased with result.
I have a hide of nice black 2 ounce leather in my stockpile, if anyone needs some let me know.
Hi Tom,
Thanks for a great ‘how-to’ . The results look great. I’ll have to look and see how many of these I need to
make.. I know several cars have missing hood corner pieces.
Greg Long
David: please hold a few sq ft for me..
Greg
David,
What is the thickness of 2oz leather? I might have some scraps and don’t know what it is. Jim
Each ounce adds 1/64 inch to the thickness, thus, 2 ounce leather (the weight of a square foot of the hide) is 1/32 inch thick.
