- Home
- About Us
- Join/Renew
- Member Benefits
- Member Pages
- Log In
- Help
- Museum Store
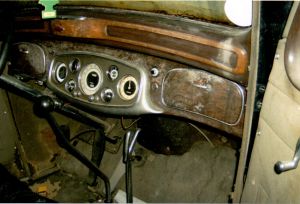
Does anyone know how the original 1933-4-5 instrument faceplates (with the woodgrained background and slightly raised chromed art-deco stripes of one, two and three lines, and instrument concentric surrounds) were finished?
I have a few I would like to refinish, and have looked at early PASB’s thru ’94, but have not found any hints on how to do it. Has anyone succeeded in getting an original looking finish? Is there a vendor?
I am guessing that holes in the thin brass plate were stamped, then most of the surface of the plate was etched several thousandths deep to leave only the raised stripes proud of the surface, then it was woodgrained between the stripes, and then “brush-chromed”” on the exposed stripes. (There is no chrome under the paint or on the back side!)
(How in the xxxx could the registration between the etching and paint be maintained? – they must have used the same mask without moving it.)
Thanks – Any suggestions would be appreciated.
Bob”
Bob, I have been cogitating on the same thing and hoping someone would reply with a “why didn’t I think of that!” solution.
In the pictures of original cars I have seen (Paul Johnson’s 35 845 sedan and another untouched 845 sedan in picture) the faceplate was not wood grained but is a sort of brownish greenish gray paint. That is also how mine is. The finish on mine is a dull matte but I don’t know if that is dulled from 80 years of exposure.
I don’t know if there were differences in this finish for 12 vs 8 or body style, or if it could be changed by special order. I don’t feel that what is on mine was the most attractive choice, however I think the choice was popular ca 1935 as my ’36 Packard instrument dash plate has a very similar color and finish in its etched depressions. By accident I had a metal priming paint that was a close match to the color.
The choices for refinishing seem to be first polish the raised parts of course. After that I think the only choices are tedious. One is just paint the whole thing then carefully polish the paint back off the raised parts with a Dremel polishing wheel or something very flat that will remove the paint from the raised bits without hitting the valleys – and not scratch the raised parts. I have done this with varying degrees of success on similar pieces, but the wide expanse of this piece with very shallow etching will make this more challenging. Perhaps if the paint is applied thick enough the raised parts will show before the polishing action removes all the paint in the depressions. The paint finish will end up polished though.
The other choice is to apply painters masking tape and tediously cut the low spots out with an Xacto.
Still hoping for a better idea!
Jim

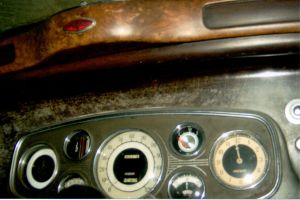
Here is a close up of an original untouched ’35 dash that shows the raised bits. Thinking a bit more about it, I am thinking the method of painting the whole thing and polishing the paint off the high spots might have a chance of success if a relatively crude mask were made that covered most of the surface and just surrounded the outside of the art deco raised bits with some clearance so the mask did not have to be super accurate. It would keep a relatively solid polisher surface from dropping into the depression.
Jim

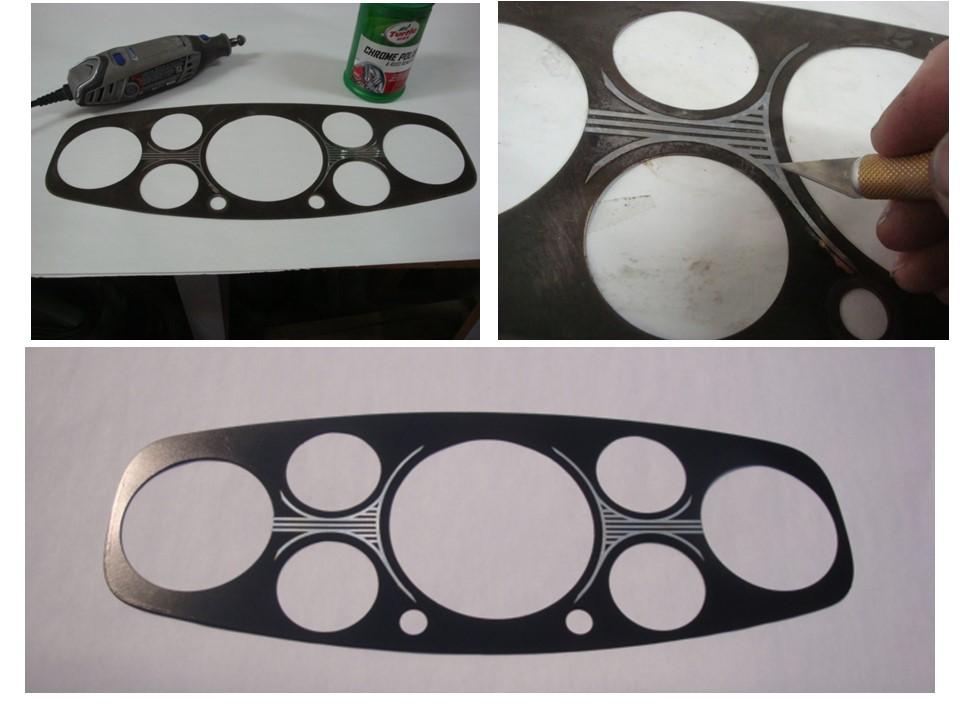
Better late than never? I just refinished my faceplate and tried several alternatives to getting the raised art deco streamline patterns to show. I tried painting over the whole thing then tried to polish off the high spots with chrome polish and rubbing compound with a very flat dense foam block. The compounds wouldn’t remove the paint, at least not in any practical time frame. I then tried removing by slightly damping the foam block with lacquer thinner and carefully wiping along the lines – close but no cigar. I tried wiping with vaseline before painting to create a release coat, my hand wasn’t steady enough. I then tried masking with painters tape but being opaque and comparatively thick I couldn’t cut out the low spots with any accuracy.
What worked was using plain old cellophane scotchtape to mask.
The steps:
1) polish the streamlines with chrome polish. I found a Dremel helped initially but the chrome plate is so thin that it could take very little of that treatment before seeing copper. Most of it was done by hand with a rag. I think the dark brownish green color was actually anodize as lacquer thinner did not remove it, but the polishing step did.
2) mask over high spots with scotch tape. the scotch tape is clear and very thin and easily cuts with a fresh #11 X-acto blade. The edges of the raised lines are just thick enough to aid in the X-acto following the edge. Very tedious needing a steady hand and a magnifier if you don’t have near-sighted natural magni-vision like me. However, the process only took about an hour and a half once started.
3) Paint, let dry
4) remove tape – also tedious.
The whole process including unsuccessful experimentation took about three hours excepting a couple hours to let paint dry.
Jim,
Very nice work. You missed your calling, you should have been a surgeon.
