- Home
- About Us
- Join/Renew
- Member Benefits
- Member Pages
- Log In
- Help
- Museum Store
Just bought a 1926 Series 80 from Colorado, this is my first Pierce Arrow. Can anyone give me some advice on where to find an engine repair manual. I can’t seem to find anything on the engine for service. If there is nothing Pierce specific do the Motor repair manuals from the 20’s cover these cars?
I’m used to working on Model T’s and there is so much info for those.
Thanks

Welcome to PAS, Jim!
There is no factory shop manual for any Pierce. Through 1929, the Owner’s Manual (usually called Operation and Care Manual) has a good bit of information on mechanical “adjustments.” You can download your OM FREE by going to “Member Pages”, then “Library”, then enter your year and model (1926 80). You’ll then be prompted to download the whole thing as a pdf.
I encourage you to obtain a copy of the Series 80 “Parts Catalogue” from the AACA Library, which holds our PAS physical collection. That Catalog runs almost 200 pages, but the first 30 pages or so are diagrams of components and their individual parts. Individual fasteners are thoroughly described by diameter and thread. This is a must-have reference!
Please read through the OM, then ask questions on the Message Board, and we Series 80 guys will get back to you with advice tempered by experience.
Looks like a very nice car you acquired.
Congrats, and we’re looking forward to answering your questions and meeting you and your S80.
Best regards, George
Hello Jim, congratulations on the ‘new’ car.
I’m quite familiar with the Series 80 engine, and have rebuilt several of them.
You are welcome to email me at [email protected] and I’ll be glad to guide you through the work needed on your engine and car. I think your car needs the head reinstalled ??
Greg Long
Thanks for the pointers, I already downloaded the OM and will get the parts catalog.
Greg- you are correct, the head is off on the car. Hopefully there are no major issues. What would the torque spec and tightening sequence be for the aluminum head?
Cograts on your new car. 
Hi Jim, the torque spec that I use is 45ftlbs. Pierce and most car manufacturers did not use torque specs in those days. The torque spec I and most mechanics use is based on the bolt or stud size and thread type.
The initial torque procedure is to tighten the head in at least three stages. I usually use 20ftlbs first, then 30ftllbs, then 40, followed by the final torque to 45ftlbs. The torque pattern is from the center outward, in a criss-cross or ‘X’ pattern. I’ll try to find the published pattern I saw in a ’30’s Motor’s Manual for various flat head engines. But any center-out, pattern if tightened in steps of 10-15ftlbs will work well, and not distort the head. The threads on the studs and head nuts must be clean and lubricated with anti-sieze.
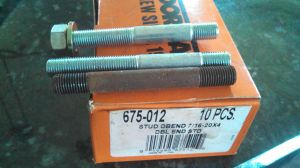
The original studs and nuts get stretched and have distorted or shallow threads. If you take a straight edge and put alongside the top of the stud next to the threads, if the stud is stretched, the threads will look like an ‘hour-glass’. Those studs must be replaced if stretched. Otherwise the threads will fail, and allow the clamping pressure to relax, resulting in a leaking gasket. Dorman sells an acceptable replacement stud. I’ll find and post the Dorman part number.
Your replacement head is aluminum, and must have washers installed under the head nuts. Originally manufacturers did not use washers, the nut distorted the surface it tightens against because of the soft aluminum material. A grade-8 machine washer is just the right diameter to fit under the head-nut, and not show. Using a conventional soft washer that is too large in diameter not only looks terrible, but doesn’t hold up well. I’ll try to get a photo for you and post here.
The flat head engines have a lot of surface area that is compressing the head gasket, The head gasket is a sandwich of copper/asbestos/copper. New head gaskets use a different ‘soft’ center material, not asbestos. The gaskets compress a lot with the initial tightening, and then slowly compress more over time and heating/cooling cycles. This results in loose, leaking head gaskets.
Because the gasket compresses so much, it it necessary to re-torque the head at least three additional times after the engine has been assembled and run, reached operating temperature, and cooled down to ambient temp. The first re-torque will amaze you. I usually find most head nuts break loose at around 30-35ftlbs, And they were torqued at 45, just a day ago, and the car only was driven a mile or two! On the second re-torque, only a few fasteners are that relaxed, and usually on the third time, most are at at least 4ftlbs when backed off for re-torque. I will perform yet another retorque after several hundred miles of driving.
The re-torque procedure follows the same tightening pattern of center-out, ‘X’ pattern. Loosen and retorque each fastener at a time, do not loosen multiple fasteners, just one at a time. Loosen each nut just enough to break the threads loose from the friction holding them, Usually just about 10* to 20* of backing off will result in the friction releasing the threads, then retorque that nut. Without backing off first, the friction of the threads will give a false torque reading.
I’ve found many engines with head gaskets seeping coolant and compression leaks, even after a proper retorque performed when rebuilt. Most engines benefit from a retorque after a season of touring.
On the Series 80 and 81 engines, the aluminum coolant outlet neck at the front of the engine is held down by the two longer head studs. Because these head fasteners must be torqued to the same tension as the rest of the head, the mounting flange/gasket surface of the coolant neck must be flat, and mate with the head evenly. AND do NOT use a thick gasket under the water neck. Use just a very thin piece of gasket material, or even a simple piece of typing or printer paper, with a thin layer of Permatex Ultra Black RTV gasket maker. Or if you like Permatex #2, that works well too.
Using a thick gasket under the coolant neck will guarantee that at the least, the mating surface will be bent and distorted by the tension of the head fasteners. Usually what happens is the old aluminum coolant neck gets the mounting ears snapped off, and they have to be welded back on. Or a new water neck obtained.
Wayne Hancock in Florida has reproduced the coolant necks, with an O-ring for sealing the coolant passageway.
Greg Long

Welcome to the best single marque and club in the world!
That is a neat and unusual body style that should be great for touring.
I strongly recommend that you purchase the Service Bulletin CD that is available through the Company Store. This can be searched by Series, Name, Number, Part, Topic or anything else you can think of. This is the best reference available to answer your questions.
Dave Stevens
