- Home
- About Us
- Join/Renew
- Member Benefits
- Member Pages
- Log In
- Help
- Museum Store
Good points, Peter. I do not have a correct cap wrench yet; however I am cutting one out of hardwood which should suffice for now.
Hi Randy, there are correct hub cap wrenches for sale, I have extras I believe. A wrench from a piece of good 5-ply 1/2″ plywood would make a good substitute wrench.
The best method to loosen the hub cap is to use heat. A hot-air gun or a propane torch. I do not recommend using an oxy/acetylene torch, it could melt the aluminum. The aluminum cap will expand much more and much quicker than the steel cub it is threaded onto. Penetrating oil won’t make it very far into the threads, if at all, The threads usually are stuck from dried-out old grease acting like a glue. Heat softens the old grease, and also expands the aluminum hub. Heat only the portion of the cap that is threaded, don’t heat the outer hex portion, it will get plenty warm enough as you heat the threaded portion of the cap.
Once you have the caps in hand, using a block of wood to back up the outside of the cap works best, the wood won’t dent or scratch the outer surface of the cap. I recommend making some custom metal punches that are the correct shape of the desired end-result. By this i mean, if you have a dented section that will be the corner of the flat and the front surface of the cap, then take a piece of 3/4″x 1/8″ steel flat-stock, and grind the end to be a smooth rounded end, sort of like a chisel, but with a rounded edge instead of a sharp cutting edge.
The reason to make specialized tools is that the old aluminum is fragile, and if you punch it out in a series of smaller punches, then you risk the possible tipping or separation of the cast aluminum. When you use a wider, smooth edge to drive out the dent in the corner or edge, it tends to compress the metal rather than stretch it in a series of punches..
I”ve a a lot of success with repairing these hub caps, it’s time consuming, but they usually look much better after a bit of work and polishing with fine sandpaper.. By fine, I mean 800grit, then 1000 grit, then 1500 grit wet/dry paper for sanding paint. The results are amazing.
Hope this helps and my descriptions make sense.
Greg Long
Greg,
If you heat the cap a bit before you start tapping on the inside will that facilitate the process of knocking out the dents?
Also, would you suggest that one makes a wooden BUCK to fit exactly around the exterior HEX so as to stop over tapping protrusions?
If not, one would have to be very patient in securing the cap in some sort of holder / vice and then rotate it before each tapping session.
Finally, I think that it is a good idea for people to understand the Rockwell Scale (hardness scale) to determine what materials are harder than others.
I found out the hard way that steel, as in steel sockets, will gouge / destroy the finish on nickel plated lug nuts and steel screwdrivers will do likewise on nickel plated screws.
I now use polished stainless steel screws on the interior trim of my Series 80.
Good old aluminum will always be the victim in a challenge between it and a steel wrench.
Be careful out there, as needing to re-plate and / or needing to repairing gouges is one of those: OH, HELL, experiences.
Peter
Gents,
We need to get our famous, Lee Iacocca Award winning, Fay Butler to do an Annual Meet presentation on the Restoration of Series 80 / Series 81 hub caps.
I will contact him on the matter.
Peter
Peter
It depends o how complex the repairs are on he cap. I would not want a hex hole in a buck, nor spend the time to make a buck that complex. If the hex on the aluminum cap is miss shaped or mangled, it would not fit in a nice hex hole in the buck. I usually just put a piece of 2×4 or 4×4 in a good bench vice and use it as the base to back up the soft aluminum cap.
Care must be taken to not work too much from the inside out, making the hex enlarge so much that it won’t fit in the hex in the hub cap wrench.
Neat does not have the same effect on aluminum as it has on most steels, Aluminum does soften at just the right temperatures, but it is very hard to maintain that temperature. unlike steel, you just maintain a dull red color.a
. Aluminum will be a molten puddle on the floor or on top of your shoe before you see it noticeably turn red.
Greg
On the subject of working aluminium. It does not like being worked while hot! It will break up. It needs to be annealed. The age old process we old guys use is to use your oxy acetylene gear (CQREFULLY!!) First light the acetylene & adjust so that it burns with a black carbon cloud. run the torch over the aluminium until it is totally coated with a beautiful flat black coating of carbon. Then set the oxy to have a soft normal flame. CAREFULLY burn off the carbon coating. Then let the aluminium cool down to room temp. The aluminium is softened to work. RECCOMENDATION
Cheers
Hi guys
I’m glad we have an experienced aluminium alchemist in the Society! Thanks for the education.
Dave
Yo Jak,
So when you are done working the annealed aluminum, does it eventually return to a relatively hard consistency as before you start the process, or does it stay relatively soft and vulnerable to distortion when you polish it or hand tighten the cap on to the wheel?
I have a spare set kicking around the needs work and might want to try your method.
Also, if one does not have an oxy-acetylene torch, can you use a plain old propane torch to do this process?
Thanks for your input.
I trust that all is well down under in OZ!
Peter
I can see that my caps have a few shallow dings which I think Ibcan gently press out from the inside. A small amount of filing to remove sharp spots, a little polishing and repainting the letteringvandcarrows, and I will be good if not perfect.
Randy,
Since Jak’s post, I have looked online into the process of re-hardening annealed aluminum.
It seems that annealed aluminum will re-harded over time (100-hours), or you can accelerate the process by placing it in an ovenat 170-degrees for 6-hours.
I am not as clear about quenching re-heated aluminum, as in heating to 550 to 600-degrees and then dropping it in a room temperature water bath.
Whatever the case, i understand that you need to be cautious or you will be hunting for new hub caps.
Peter
Hi again—-I believe quenching is not recommended. My main experience with aluminium has been making body panels & forming extruded sections such as tee & channel sections with minimum distortion, such as a windscreen frame. Sometimes you need to anneal the section multiple times & only bend a small amount at a time. Patience is a virtue!
T’would be nice to use propane —BUT— you need the temperature control that the burning off of the carbon deposit gives you. Aluminium does not squeal before instantly turning to liquid! Peter’s last post adds expert detail. Cheers from the other side of them world where there are few Pierce Arrows.
On a couple of the sites that I visited they suggest using SOAP on the aluminum, as in rubbing the soap bar on the aluminum and then heating it.
They showed that when the soap turned black / sooty, the aluminum was ready to manipulate.
They indicated that the soap would act as a thermometer / heat gauge for when the aluminum was at the proper temperature.
In at least one YouTube video, the guy was using a small, pistol grip type, hand-held torch.
Thanks for the comments Jak.
It is always a pleasure to be in on a thread where you offer advice.
Thanks Peter
Randy,
I think that you asked some time ago about painting Series 80 hubs.
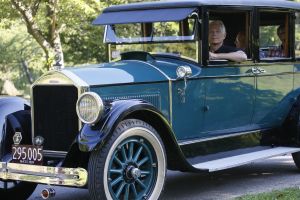
Here is a photo of a fancy paint job.
Peter
Randy,
BTW, I think the the hub plate should be BLACK with pin striping around the hub.
Of course, that is my opinion and you should look at a ton of P-A wheels before you decide how to do yours.
I attach a photo of me and Chauncey from the Buffalo Meet.
I believe that the detail is sufficient for you to see the wheel paint scheme.
Peter

Peter, Very nice! And most helpful, too!
By the way: is that amber lamp below the bumper an added safety lamp, as a turn signal or running lamp? I am working on some for my Car.
Thanks for sharing!
RR
Peter,
I would sure like to see more pictures of you car. Great looking car.
Ken
Randy,
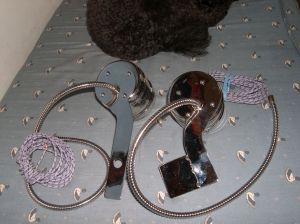
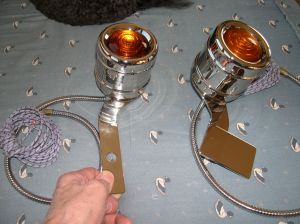
The amber light is a turn signal that I created from extra Series 80 – TYPE A taillight cans.
I collected a bunch of them, good and bad, took the best ones to my plating guy and had them plated in nickel.
I also went to my local sheetmetal shop and had them cut out steel lollipop shaped mounting plates.
I also had them plated in nickel.
I then concocted a switch box with a three position switch and light.
I mounted that under the dash left of the steering wheel.
That is attached to a 6v flasher unit and a Piezo beeper which make me flip off the switch, otherwise I found I would be blinking for miles.
The process was expensive and you can purchase a set of turn signals from LaBarron Bonney for about $150, but then again, those are for Model A Fords.
I will post a few photos.
I have them on the front and rear.
Peter

Number two

