- Home
- About Us
- Join/Renew
- Member Benefits
- Member Pages
- Log In
- Help
- Museum Store
Delete one HTTP
Randy,
One more detailing the components of the blinker system and the utility of a 6v lantern battery.
Peter
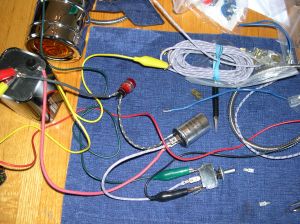
Randy,
Also note that finding those 2.5-inch amber GLASS lenses was difficult.
I have a few spares, but recent eBay searches have not been productive.
Peter
Number three and final blinker photo.
BTW, the shape of the lollipops specifically accommodate my after-market bumper arrangement.
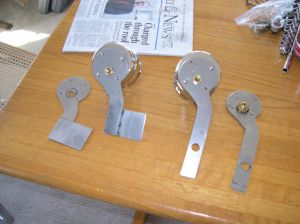
Number two
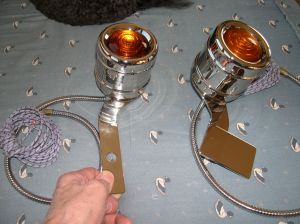
Randy,
The amber light is a turn signal that I created from extra Series 80 – TYPE A taillight cans.
I collected a bunch of them, good and bad, took the best ones to my plating guy and had them plated in nickel.
I also went to my local sheetmetal shop and had them cut out steel lollipop shaped mounting plates.
I also had them plated in nickel.
I then concocted a switch box with a three position switch and light.
I mounted that under the dash left of the steering wheel.
That is attached to a 6v flasher unit and a Piezo beeper which make me flip off the switch, otherwise I found I would be blinking for miles.
The process was expensive and you can purchase a set of turn signals from LaBarron Bonney for about $150, but then again, those are for Model A Fords.
I will post a few photos.
I have them on the front and rear.
Peter
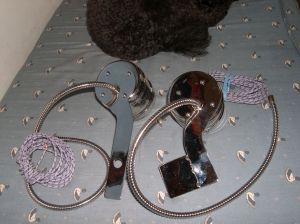
Randy,
BTW, I think the the hub plate should be BLACK with pin striping around the hub.
Of course, that is my opinion and you should look at a ton of P-A wheels before you decide how to do yours.
I attach a photo of me and Chauncey from the Buffalo Meet.
I believe that the detail is sufficient for you to see the wheel paint scheme.
Peter
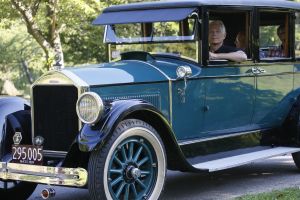
Randy,
I think that you asked some time ago about painting Series 80 hubs.
Here is a photo of a fancy paint job.
Peter
On a couple of the sites that I visited they suggest using SOAP on the aluminum, as in rubbing the soap bar on the aluminum and then heating it.
They showed that when the soap turned black / sooty, the aluminum was ready to manipulate.
They indicated that the soap would act as a thermometer / heat gauge for when the aluminum was at the proper temperature.
In at least one YouTube video, the guy was using a small, pistol grip type, hand-held torch.
Thanks for the comments Jak.
It is always a pleasure to be in on a thread where you offer advice.
Randy,
Since Jak’s post, I have looked online into the process of re-hardening annealed aluminum.
It seems that annealed aluminum will re-harded over time (100-hours), or you can accelerate the process by placing it in an ovenat 170-degrees for 6-hours.
I am not as clear about quenching re-heated aluminum, as in heating to 550 to 600-degrees and then dropping it in a room temperature water bath.
Whatever the case, i understand that you need to be cautious or you will be hunting for new hub caps.
Peter
Yo Jak,
So when you are done working the annealed aluminum, does it eventually return to a relatively hard consistency as before you start the process, or does it stay relatively soft and vulnerable to distortion when you polish it or hand tighten the cap on to the wheel?
I have a spare set kicking around the needs work and might want to try your method.
Also, if one does not have an oxy-acetylene torch, can you use a plain old propane torch to do this process?
Thanks for your input.
I trust that all is well down under in OZ!
Peter
Gents,
We need to get our famous, Lee Iacocca Award winning, Fay Butler to do an Annual Meet presentation on the Restoration of Series 80 / Series 81 hub caps.
I will contact him on the matter.
Peter
Peter
Greg,
If you heat the cap a bit before you start tapping on the inside will that facilitate the process of knocking out the dents?
Also, would you suggest that one makes a wooden BUCK to fit exactly around the exterior HEX so as to stop over tapping protrusions?
If not, one would have to be very patient in securing the cap in some sort of holder / vice and then rotate it before each tapping session.
Finally, I think that it is a good idea for people to understand the Rockwell Scale (hardness scale) to determine what materials are harder than others.
I found out the hard way that steel, as in steel sockets, will gouge / destroy the finish on nickel plated lug nuts and steel screwdrivers will do likewise on nickel plated screws.
I now use polished stainless steel screws on the interior trim of my Series 80.
Good old aluminum will always be the victim in a challenge between it and a steel wrench.
Be careful out there, as needing to re-plate and / or needing to repairing gouges is one of those: OH, HELL, experiences.
Peter
Also, on wheel related matters, the lug nuts on the wheels are torqued to only 25-ft-lbs.
The P-A lug nut wrench is short to keep the torque down.
If you over-torque the lug nuts, you will stretch the relatively soft steel stud threads.
Randy,
When you are all done making them beautiful, coat the threads of the cap and the wheel with a thin coat of Anti-Seize to keep then from binding.
Your caps are damaged because some impatient person took a steel wrench to them to crank them off of the wheel.
They should have liberally applied some penetrating oil.
Your P-A wheel wrench should just dislodge them and from there on, you should remove them by hand.
Mine are on firmly, but hand tight.
I would cover them with a latex glove, or something, before putting any kind of wrench on them.
Peter
The advantage of the lantern battery is that it is totally portable, so you can, for example, take it to the headlights and check the connection of the bulbs in the sockets, or aft to the tail lights to check those sockets and wire runs.
I rewired my Series 80 and spent plenty of time lying under it with the battery checking the wire runs before final assembly of the difficult to assemble light cans, etc.
After you get everything working, you will have a 6v battery that sits around on your shelf for years waiting for something else to fail.
I have only used them for a few times since the rewiring.
You can see the shielded wire near the bottom of the photo going up the steering column to where it is taped to the column with the red / orange tube,.
You can see it again, further up at about 1:00 and then again dropping down at about Noon.
The engine bay looks better these days!
David,
Do you have any of the pieces?
There is a spring loaded button that that is held on to the horn cap with a screw.
The horn cap has a brass plate installed on its bottom side and it screws on to a brass plate that is mounted on to the steering column.
In the center of this assembly there is a steel shielded wire that has a metal tip on the end that electrifies the horn when the horn button touches it.
The shielded wire runs down the steering column (through the center tube / tubes that adjust the spark advance and the carburetor run speed) and comes out the end of the steering column.
The wire then loops up and is eventually connected to the horn.
When connected properly, the horn goes: BEEP!
I attach an old photo during an engine block strip down that shows the shielded wire (silver colored) coming out of the steering column and looping UP the column on its way to the horn (not there in the photo).
I hope that this helps.
Peter
BTW, all of you NEW Pierce-Arrow Gents should go out and buy a 6V Lantern Battery and a set of alligator clips so that you can easily check your wiring connections / connectivity without having to have the car battery connected.

Aluminum
Randy,
Remember that it is a Pierce-Arrow, so you could order it an any color you wished, including the color on the hubs.
However, I would avoid Day-Glo Lime Green.
Peter
