- Home
- About Us
- Join/Renew
- Member Benefits
- Member Pages
- Log In
- Help
- Museum Store
Does anyone know where to located the gasket that goes behind the headlight lens for a 1925 series 80?
Thanks
The lens gasket goes in front of the lens in the little valley surrounding the lamp door liner.The door has two parts those being the door itself and the liner which retains the lens.The gasket is like rubber tubing which gets compressed when the lens is in place forming a seal.There was an issue of the PAS service bulletins which had a very informative article on Pierce Arrow headlamps with parts book illustrations.
Chester,
Between the lens, already mounted in the lens ring, and the reflector there is a rubberized cork gasket that sits on the reflector flange to cushion the lens while it sits against the reflector.
My 1925 Series 80 originally had them, but they were in bad shape so I made new ones and used some sort of glue to attach them to the reflector flange.
I purchased a Gasket Making set (@ NAPA), that is composed of a number of sheets of gasket material including rubberized cork.
I sed the other gasket making sheets in the set for other P-A applications.
Later, I purchased sheets of rubberized cork on McMaster-Carr for different application, and I forget if I used them for this application.
One type of cork sheeting that McMaster-Carr sells has an adhesive backing.
I hope that this information helps.
Peter
Chester,
On another matter regarding rubberized cork sheeting, my Series 80 originally had a full length / total coverage cork gasket that covered the side valve train cover, but I needed to remove it to adjust the valves.
Of course, it disintegrated when I remove it.
I replaced it by using the Olsen Gaskets Perimeter Style cork gasket for the valve cover, but no matter what I did, oil leaked from the cover.
I created a new, full coverage gasket from rubberized cork sheeting and the oil leaking problem disappeared.
I then contacted Olsen Gaskets and told them of the problem / solution, sent them a sample, and now that is what they sell for the Series 80 valve cover gasket.
Note that the full coverage gasket has a hole in it to accommodate the breather tube.
Again, I hope that this information is useful.
Peter
Peter,
it appears as though the gasket needs to be about 1/2″ thick correct?”
The doors on my 1929 Pierce Arrow 133 Roadster have the cork gasket in the valley in front of the lens with the lens being held in by a series of clips.Beginning in 1919 when the cars were fitted with the Bausch&Lomb prismatic lens a hollow rubber
gasket was placed in front of the lens with a wire retainer ring holding the lens assembly in place against the gasket.Prior to 1919 when the plate glass was used,it appears a grey putty was used in front of the lens and this is arrangement for the original doors on my C-3 Pierce Arrow.A suitable gasket could be made from windshield washer tubing.
The line-drawing on page 19 of the Series 80 parts manual shows a ‘packing’ between the bezel and the lens. There is no other gasket of packing.
As Bill wrote, there lens his held in a recess by several screws that hold clips in place against the lens. The packing is, from it’s location intended to keep rain from passing between the gals and the nickeled brass headlamp bezel or rim. There is a nice recess, triangular in cross section between the bezel’s inner edge where it touches the glass, the recess the lines sits in, and the front face of the lens’s outer rim.
I’ve seen a compressed piece of rubber, it might have once been tube.. and i’ve seen a rock hard putty.filling the recess.
There is at least 3/8″ to maybe 1/2″” of clear space between the headlight lens and the front of the reflector and the reflector’s retaining screws.. No gasket or packing between the lens and the reflector.
Greg Long
“
Chester,
I just made up a cork gasket of whatever thickness the gasket material was, perhaps â…›” to replace what existed.
Greg indicates that there is no gasket shown in the diagrams, but on my Series 80 that has been in the family since 1928, they were there.
In addition, I have no idea what the distance is between the back of the lens assembly and the front of the reflector because I do not have X-ray vision.
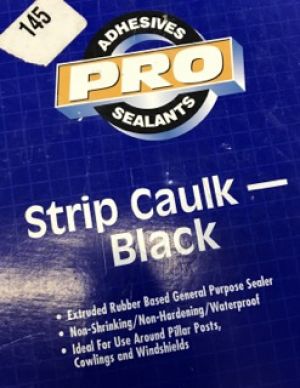
Regarding the gasket material between the front perimeter of the lens and the valley described by Bill and Greg, I used black butyl rubber glass glazing strips.
They come in a package with three life-times quantity.
The stuff is sticky and does not dry out.
I have one hundred feet of it if you are interested (I’ll box it and send it).
The strips compress and squish when you put the lens in and tighten the retaining screws.
You then need to clean the excess squish off of the front of the lens assembly with a razor-knife.
It is a bit of a pain, but it clearly seals the lens to the frame and can be removed with just a bit of elbow grease.
They used this type of glazing material for sealing 1980s / 1990s windshields into the windshield frame gasket and for sealing the gasket to the body.
It is sold at NAPA or other auto supply stores.
Without it, there were often rain leaks in my 1980s BMW cars windshield corners.
If you are interested in at least seeing it, send me an email and I will send you a yard or so for consideration.
Peter
No Xray eyes needed, just a tape measure.

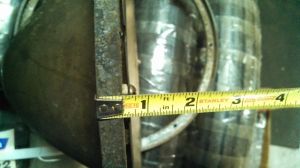
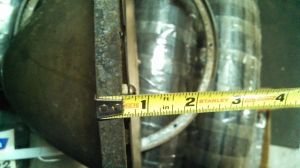
In the above post, and photo, it can be seen that measuring from the rear of the mounting ring to the head of the reflector mounting screw is 3/4″ The rear of the mounting ring is a far back as the bezel will slide.
The mounting ring is screwed to the fender, providing a smooth surface for the bezel to slide onto.
Then in this photo to the right, the measuring tape is 3/8″ from the glass lens. There is a flat perimeter that is the mounting flange around the rim of the lens. The lens is thicker inside this mounting flange but the reflector rim ends at the inner edge of the lens’ rim.. so there is no chance of contact..
Therefore, there is no need for tall stack of gasket material acting as a spacer between the lens perimeter, it’s retaining clips and screws, and the reflector and it’s mounting screws. There is a 3/8″ air gap. no metal to metal contact..
I suspect that at some time in the life of Peter’s car’s life, that the screws and retaining clips were lost or loose, and a spacer was made to help hold the glass lens into it’s recess. The clips may have been found, or purchased and replaced.. but the stack of spacing material not removed..
?? who knows what happens in the life of a car in 85-90 years? The lenses may have come loose on a road trip, and some corner repair shop, with the owner having plenty of ‘McGuiver’ blood, did what he could to keep the lens in place..
it certainly was not a Pierce Arrow original method of keeping the lens in it’s recess.
Greg Long

Gents,
The cork gasket was / is mounted on the reflector flange, but is obviously not necessary.
The lenses are held in place with clips and now, instead of old dried out gasket between the lens and the rear of the lens assembly there is the butyl rubber gasket material I described above and show with the attached photos.
Peter

Gents,
The butyl rubber gasket material in the “NAPA Brand”” is #4424 and is a Martin-Senour Paints product.
I am confident that one could find similar material at any auto parts store.
It really is great stuff for all types of automotive applications where SERIOUS STICK is essential.
Peter”
