- Home
- About Us
- Join/Renew
- Member Benefits
- Member Pages
- Log In
- Help
- Museum Store
Finally I have had time to continue rebuilding my P-A.
Today we disassembled the front for engine removal.
There were some strange looking objects under the car, that my imagination cannot tell what they are for. Maybe someone on the forum might pass information.
Here’s the strange looking accessory in the steering gear assembly. What this does?
And this one is from front axle. The cable comes from transmission! What’s this for?
I’m trying to remove only the engine and leave the transmission in the car. We took all the bolts that connect the cylinder block to clutch housing off, but we cannot get the block separated from the clutch housing.
I was wondering, can there be any more bolts inside the clutch housing that is bolted to block, or is the transmission shaft/bearing holding the tranny so tightly to cylinder block?
I was hoping to leave the tranny in the car standing on the mounts that are located in the rear of the cylinder block (below firewall) .
Mika,
Photo #1 is showing the housing for the lighting switch which looks like it is still inside the housing. The switch is controlled by a lever on the end of the steering column (inside the car and next to the horn button)
Photo #2 shows that actuating mechanism for the power brakes. The power brake unit is attached to the rear of the transmission and the cables from the brake unit pull the actuators shown in the photo. These in turn operate cams inside the brake drums to expand the shoes.
Bill
Thanks William, I really appreciate this.
BTW, is there any of those new rubber motormounts available, it seems that these ones have melted in some strange way… 
Mika, You can get the motormounts from Dave Murray in Gig Harbor , Washington. I used them on my 1933 1247. Doug Vogel
Thanks Doug, I kind of suspected that ! LOL 
Hey, can you guys give an advice on the engine removal issue. I’m not quite familiar how to get it loose from clutch housing 
Oh, and does anyone of you know what’s the small electrical box, that looks like a voltage regulator in the front of the engine attached to near the bar pictured above ? (i think it’s on the front of the frame)
I need a better picture, but it sounds like the horn relay.
This is the best picture I have, it’s partly visible there in the left side of the picture.
It seems to be in the right position to be the horn relay. I’m pretty sure that’s what it is.
Bill
Thanks Bill!
Anyone have any tips on the engine removal issue? I do have tons of Service Bulletins on thos 3 cd’s , but I’m using a Macintosh and is seems that Adobe PDF indexing feature is outdated for Mac workstations, so It’s quite a task go all through invidually to find any information 
My summer holidays has just began and I’m planning to work on Pierce as much as I can!
Thanks in advance!
Mika,
I suggest that you pull the engine and transmission together. It’s much easier to deal with the separation of he clutch housing and the engine with everything out of the car.
I also suggest that you get a leveler to go between your crane and the engine. They aren’t very expensive and they really help you make those little tilting adjustments that help with the removal and reinstallation. I’m posting a photo of the one I used when reinstalling my 1240A engine and transmission.
Bill

Hi Bill!
That seems quite nice gadget there. Where can I find one?
Is there any seals etc in the transmission that would be good to replace after long (40 years) storage period?
It seems that the car has been running in 1999 …
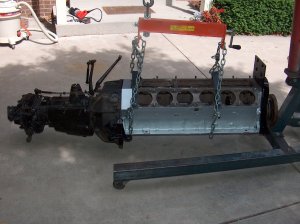
I found that kind of leveler from local shop for ~30 USD and it really did the trick. The leveler was bolted under cylinder head nuts. We got the engine removed and we didn’t break a thing! 
The most difficult part was to get the rear motormount “shield”” over the motor mount brackets on the frame.
The engine itself came loose from the transmission clutch cover very easily!
Now I can finally start drilling those broken water manifold bolts.
Is there a way to check clutch pressure assembly condition? How do I know that those parts are ok?
How can I check that the clutch
“
I know … there really isn’t much room to do this, there’s one fine ’59 Cadillac blocking the way but we managed to get the engine out anyway 
Here’s the clutch assembly
And here’s the engine compartment view.
I was thinking of removing the oil pan from the engine too and cleaning it up as well as rebuilding/replacing the oil pump..
OK, today I got the water manifold bolts drilled off and created new 5/16-18 threads.
What I did first is I hit a mark in the middle of the broken bolt to center the drill bit.
Then I used smaller cobolt 3 mm drill bit to drill the first hole.
After the smaller hole was drilled, I used 6.5 mm drill bit (size F) that’s used when creating 5/16-18 threads.
I used 2 kinds of thread taps.
first one was 5/16-18 “piloting tap””
and the scond was “”finishing tap””
“
