- Home
- About Us
- Join/Renew
- Member Benefits
- Member Pages
- Log In
- Help
- Museum Store
OK, We have just about run the photo challenge out to the end. Here is the “NEW” challenge. Please post photos and text on this winters car repairs and upgrades. Any and all topics are fine as long as they are current. Water pump rebuilds, new tires, getting the car ready for the PAS 2011 meet. If it’s a large or long project, post photos as you make progress. This thread will be split in two parts, #1 for all things before the PAS National, then a new thread for items afterwards. Photos of you car at other meets and tours are OK. Lets keep these popular and active threads going. Let the other members in the club know the members only section is active with photos and lots of other information that is available only online! Please post! Thanks, Ed
1703 steering gear ready for reassembly. John Cislak provided the numbers for the modern lip seals (471744 and 471750) to replace the cork and leather originals. The loose balls are readily available at specialty fastener stores and the lever shaft needle bearings are still a current number (B-2016).
Here’s a picture of my current project a 1931 Model 42, there will be more photos coming soon.

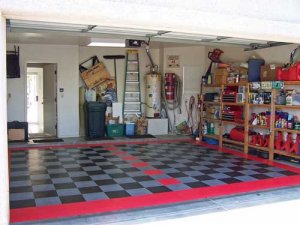
This isn’t a Pierce-specific post, but as it involves a garage fix, some may this project relavent. A couple of my neighbors here in Arizona have redone their garage floors in epoxy paint, giving the floor a beautiful , smooth, clean, and easy-to-maintain surface. The results are terrific, but I’ve always found the whole process to be intimidating. It’s the very first step that’s the problem. Before you can power wash it, and etch the concrete, and paint it, and let it cure, you have to empty the darn place. That’s a big time problem when you have an antique car hobbyist, and an oil painter/metal and glass worker co-habiting the same garage space. There’s just a whole lot of stuff, all of it very necessary of course, squirreled away in there! Here’s the way the garage looked at 8 am today. I’ll post the “After”” photo in just a few minutes.
“

About three years ago, I started exploring alternatives. I’d seen some pretty nice tiled floors used in private museums and collections we’d visited on various car tours. I learned that the tiles were produced by Snap Lock Industries in Salt Lake City under the RaceDeck Garage Floors label. Their website, http://www.racedeck.com/, not only showed a lot of interesting examples of floor design, but it also had a feature that allowed me to design my own pattern and submit it for an estimate.This Thanksgiving they ran a Black Friday Sale. I booked the order with the provision that it wouldn’t be delivered until after the New Year when we returned from Minnesota. Good to their word, the order arrived from RaceDeck yesterday, and I installed it this morning. Installation was easy. It took only four hours and required only a rubber mallet. But the best part was I didn’t have to deal with emptying the garage! I’m happy. Patti’s happy. The garage is happy. The cars are happy….except the Pierce, which a foot and half to long for this garage, so it has to spend the winter back up north.

You are very fortunate to have obtained a good price on this material. It is very beautiful, and I hear very durable. Moreover, the installation of epoxy and a concrete floor, both old and new is a formidable task. I have a bay here in Florida, where I keep the old cars. When we bought it, I decided to have an epoxy floor installed. The contractor who installed the floor had done it many times before. The process was as follows: strip floor, etch floor with acid, neutralize acid, apply two part epoxy. This floor is indestructible. Outside of dropping an anvil on it, it is as it was. It is difficult to stain. Now, the floor in the garage in my new house in Saratoga also had epoxy installed on new concrete. Although the job is commercially acceptable, little bitty bubbles are visible in many places. Probably the most important part of the process (although if any part of the process is missed, some failure occurs), is the neutralizing and rinsing of the acid etch. This causes paint lifting, or in my case bubbling. The floor must be neutralized, and rinsed. Rinsed many times or the remnants of the acid process remains.
Minnesota Tony, thanks for the information on tiles-that flooring is beautiful. How tall does it build up the floor-I assume it uses a taper on the edge?
Tony Z, I have wanted to epoxy my floor for several years, but the challenges have always made me put it off. The neutralizing acid as you desribe is not well emphasized in the sales materials I have read.
Thank you both!
Very neat floor idea. I have never seen that system before. I went to their web site and requested an estimate for my garage. Thanks Tony!
The most important thing I learned about using epoxy paint on a new surface is to let the concrete cure for 6 months before the acid washing and rinsing begins. It takes at least that long for the moisture to seep from the concrete. If done properly, it’s a great finish.
Rick
John, the tiles build up the floor by a half inch. Also, I did buy a tapered piece for the entry edge.
Enough about floors and back to cars ! My neighbor stopped by to check on the progress of the 1934 840A Club Brougham the other day when we had the hood off of the car. Do you think these hoods are big enough ??

Are you missing chrome spears for those vents? I have some – need to be chromed however.
I may need a few, how much are they ?
Hi all, As many of you know, I share a building with John Cislak of Classic Auto, who makes a handfull of Pierce reproduction parts. He has quite a few restoration projects in the shop related to Pierce at any one time, and I thought I would post some photos of them that would be of intrest to club members. Currently he has 6 engine rebuilds in the shop, 4 of them are PA’s. Hope you enjoy enjoy the photos. Ed
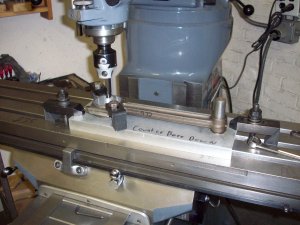
Connecting rod bearing inserts for a late model Pierce 8.

In the two rod photos, you can see the jig made to hold the rods square and flat to check for bends and twists. It also assures the rod length is the same on all eight rods. New rod bolts must be installed to machine the Pierce factory rods for inserts.

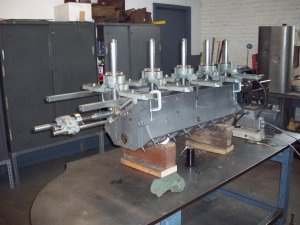
Here is a photo of a boring bar about to cut the main bearings on a late model V-12.

This boring bar was originally manufactured to cut the bearings by hand, but the finish was not perfect, so he made a motor and drive system with variable speeds to run the cutter.

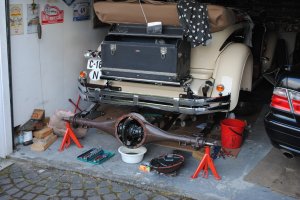
There has been earlier much discussion about the the High Speed Rear End Gears. I some years back bought the gears from Phil Hill. In fact I visited him in Santa Monica together with Irvind Blonder in 1989. Even an amateur as me can assemble that after some advice. I did it last april in my own garage (photo).

Here you can see the differences of the two pinion gears. The big one is the high speed gear.
On this photo you can see how the ring gear is stuck – no space to turn around. Nobody had told me how to do it – that I had to remove som metal on the inside of the case. In fact I gave up and assembled the old original gear set.
