- Home
- About Us
- Join/Renew
- Member Benefits
- Member Pages
- Log In
- Help
- Museum Store
Tagged: top molding, top nail strip
Okay, this definitely wasn’t the way this was done at the factory, but when one doesn’t have the original tooling and skills, I feel the need to improvise to match my own limited repertoire. I am not saying this is the best way to do this, just one way, I hope.
Originally the nail strips were just that, after tacking down the fabric top material the nail strips were nailed down with nails. Presumably the factory had handy jig fixtures to shape the nail strip quickly and pre drill the holes to match the oblong holes in the top sheet metal. The whole process to form the strip, drill, nail, and install probably took them less than one manhour, compared to me taking at least 40.
Those who have experience doing this will likely be rolling their eyes at my convoluted method – I can hear comments like “criminy, just do it!” in my imagination. However, I have a few limitations that sent me down this path. One, I can’t hit a nail on the head three times in a row to save my soul, and bashing the nail strip at best and the new paint work at worst seemed inevitable. Second, forming the nail strips with rudimentary tooling means the nail strip will not match the curvature of the channel in the sheet metal perfectly and must be finessed by local adjustments in the car. This means it is highly advantageous to use removeable screws to match drill and adjust curvature before trying to do this with the top insert already tacked down with weather stripping and covering the channel. The guides I have read (for Model A’s) talk about predrilling the nail strip at 1 ½” intervals before forming. This might be fine for older vintage cars with straight nail strip sections that don’t need forming, but with the continuous curves of mid-30’s cars I didn’t see how one was going to assure that the nail strip holes would register every time with the oblong body holes before bending the curves.
Third, screws can be removed without damaging the nail strips if the top needs to be replaced again in the future. I managed to get the top nail strip removed intact enough on my Packard years ago, but wasn’t so difficult since all the wood was rotten and not holding the nails well anyway.
The largest diameter screw I could find with a head small enough to fit down into the upside hat section (.18” wide) was tiny 3-48 allen head machine screws. Of course, the 3-48 thread is intended for metal not hardwood. On the other hand nails have little grooving to improve withdrawal l resistance. Since screws are driven in with torque instead of being driven in directly, there is always a danger that the shaft will twist off.
To test the suitability of using 3-48 screws I pilot drilled a piece of ash and drove some nails, and then 3-48 ½” long socket head cap screws into it. Because of the likelihood of twisting off the screws with too much torque I used common Grade 8 alloy steel screws – 170,000 psi tensile stress instead of stainless that is only 70,000 psi. I used an electric drill driver and initially set the torque limit clutch to “1” and the screw went down without a problem. Setting the clutch as high as “5” did not twist the screw off, but did strip out the threads in the wood. Strictly by feel – no instruments – I then felt how much resistance it took to pull them out with a claw hammer. The screws had clearly more initial resistance, but once started out they pulled out with less resistance than the nails. What counts of course is the resistance as set, not after being forced out.
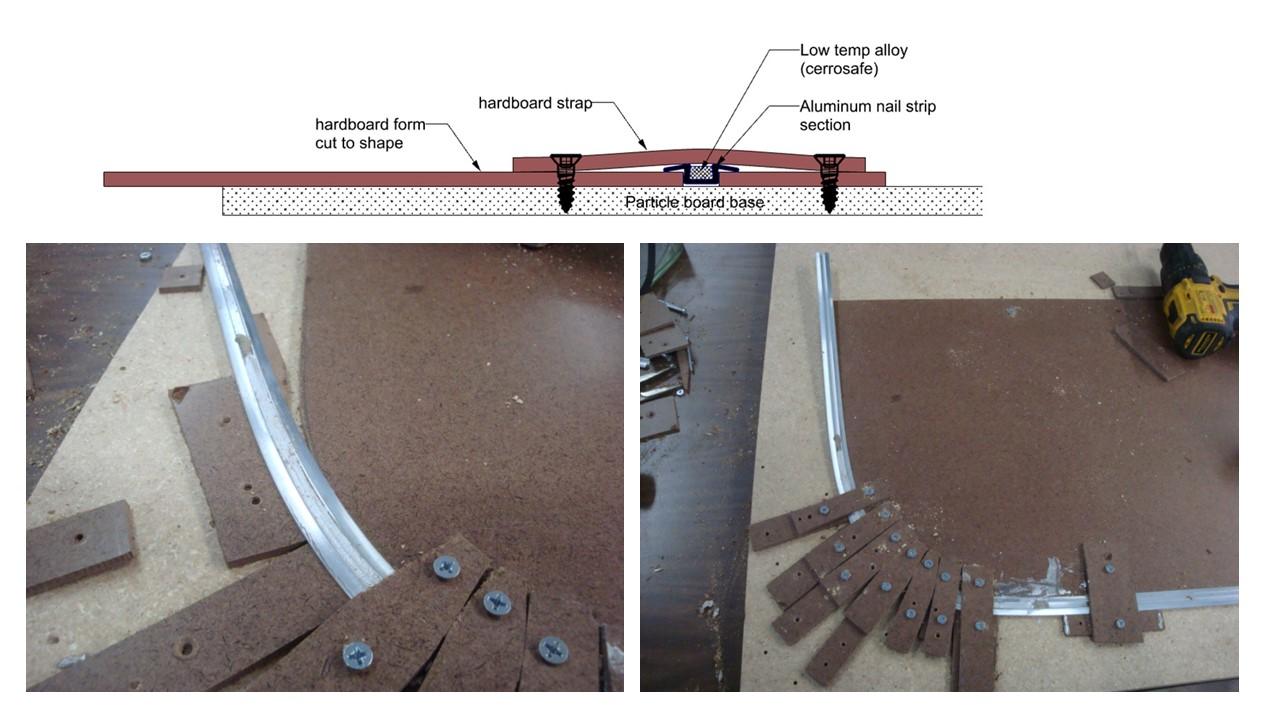
The nail strips were initially formed against a piece of hardboard cut to the shape of the channel of the body. I had received some info from other members who had successfully bent the upside down hat section for their Pierce by rigging up some special steel tooling to bend a constant radius that would control the twisting of the section and the flanges trying to cripple and bend. The ’34-’38 sedans have two basic radii at the front and back, with more gentle curves and straight sections connecting them. This method obviously has worked well, as the biggest challenge is controlling the section in the tight corner radii. Once those are done the more gentle curves can be manipulated by hand. I have more experience (and tools) with forming against wood forms, so I opted to start with shaped hardboard forms. Either way, low temp cerrosafe alloy is melted to fill the inside of the hat section in the tight radii areas to keep it from collapsing.

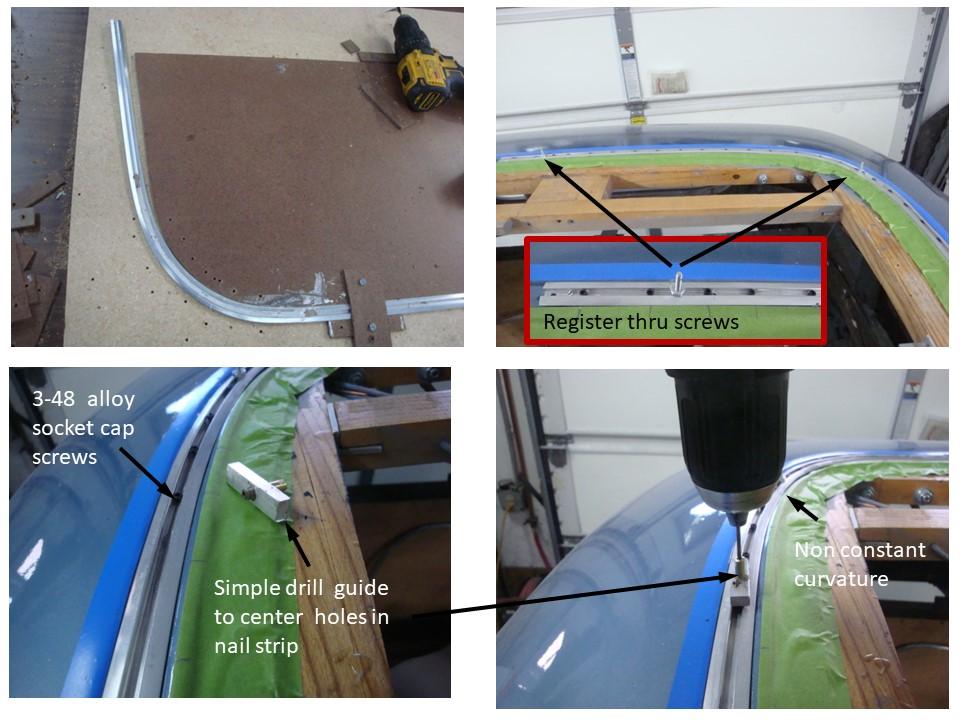
The soft aluminum is not so soft that it doesn’t have springback after forming. I corrected for this in two stages, first after bending the tight curves, I removed the forming hardboard and just manipulated the shapes by hand to match the shape drawn on the bottom particle board sheet. When put on the car, there were still deviations from the channel shape. This is where the screws come in handy. Before ever installing the top fabric the nail strips are progressively pilot drilled and screwed into the bare top channel. They fix the strip solidly in place as it goes down, making it possible to finesse the curvature locally by hand. When all the strips have been match drilled and screwed down, they then can be removed with some hope of going back in reliably after the fabric is tacked down.
Masking tape was put down along the inside edge of the channel and marks made across to guide locations that would hit every other oblong hole in the channel. I used 5/64” drills to pilot through the nail strips and the wood framing. A simple drill guide for the pilot holes was made by using some telescoping brass tubes pushed into a small aluminum block. This was to make sure the holes were closely centered in the bottom of the hat section trough, as there is very little clearance for the screw heads. Then a 3/32” drill was used to open up just the nail strip holes to allow the 3-48 screws to go through the nail strip before driving the 3-48 screws with a drill driver.

Because everything is match drilled, I was worried about how to find the exact location for the nail strips once the fabric top is tacked down and covering the channel. I drilled holes for long 4-40 screws in the middle and at the corners completely through the wood frame and nail strip. Once the top fabric is installed, these holes can be drilled through the tacked down fabric from inside the car, and the 4-40 bolts pushed through from the bottom and to positively register the nail strips in position. It will be necessary to fill those holes with caulk after installation.
I anticipate that I will use ¾” long screws primarily on the top (to account for the added thickness of top fabric and weatherstripping) and keep some 1” long handy. It seems inevitable that some will strip out. It turns out that installing the nail strip with screws into the car never even reached the “1” setting of the drill driver clutch before pulling the hat section down hard in the channel. When I get the longer screws I will do some more testing to make sure the driving torque won’t twist off the screw head.
Great information, thank you for sharing. Where did you source your channel from?
I think it was Macs Ford parts but might have been Snyder’s. I recall measuring what the lengths of each quarter would be to determine that they could cut them and ship them straight to avoid having them rolled up or left long for a ridiculous oversize shipping charge. I had to call and talk to a person to get that arranged.
