- Home
- About Us
- Join/Renew
- Member Benefits
- Member Pages
- Log In
- Help
- Museum Store
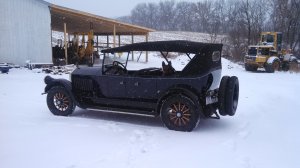
To encourage others to post what they are doing during the “off” winter months I thought I would post this photo. It was 18 degrees out. The car is stored in an unheated garage. started right up after sitting 8 weeks. Took it for a 40 mile drive and it ran great. Lots of people honking and waving at me, so they must like to see a Pierce on the road in the off season. Car is away till March now. Merry christmas to all my fellow PAS friends.

Another photo.

Happy Holidays Ed!
Not only were you driving with snow on the ground, but also on a gravel road? Shocking! If this type of behavior becomes contagious we might even see some lunatics actually driving their Pierce-Arrows to Annual Meets.
What kind of example are you trying to set?
Dave
(Answer: A damn fine example!)
Well, we don’t have snow, and not too many gravel roads, but we do drive the old cars in winter!
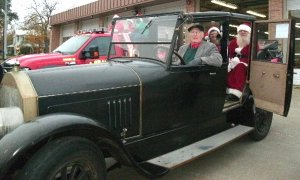
Arnold, driving Santa in a PA makes you a hero!
Enjoy the holidays!-John and Sue
Winter Projects ?
Well, LOKI, [the dog in the back seat] insisted on a last drive before the car was put away for the winter, and for much needed engine work. So we went for a snow-run. On my gravel back roads, no salt, only fresh snow. A little bit of fresh pure snow won’t hurt anything.
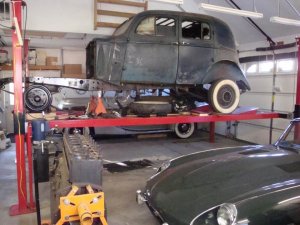
In the background is the 30’x60′ showroom/addition to the shop. I’ve run out of room, Every time I need to put a car on the lift to do some work, from an oil change to a transmission overhaul. I have to put at least two vehicles out in the weather, and often a tractor as well.
The showroom will store and show 8 cars comfortably, and give me much needed room to put up several decades worth of PAS national meet posters, and other memorabilia.
I have to say, driving an open car in 30* weather sure tests one’s ability to stand the cold.
Greg L
Merry Christmas Everyone !!
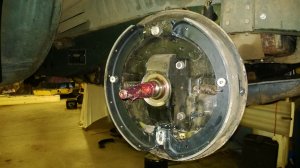
Eleanor, our 1601, is in the shop this month for new brakes, driver’s side front fender paint and a new coil. Interestingly, all the brake shoes on the car had the same red 12/11/35 date-stamp and we can only guess they were the original brakes on the car with 33k miles now on the clock – asbestos linings and everything!
The original brake shoes were re-lined by
Brake Materials and Parts, Inc.
800 Sherman Blvd.
Ft. Wayne, IN 46808
(260) 426-3331, contact Scott Bethke
and this Co. was referred to us by Ft. Wayne Clutch
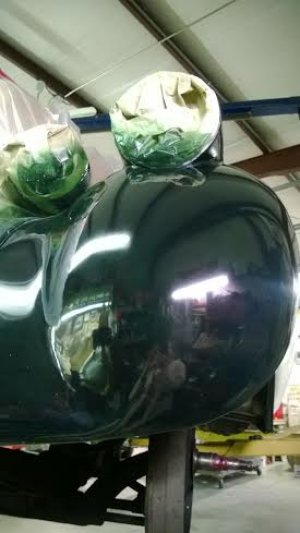
Here’s a photo of the front fender re-spray in lacquer. Both front fenders were re-painted in Oregon in 2010, however, this past August, we had some paint lifting over some marginally prepped bodywork – now’s a great time to get it fixed.
Happy Holidays to Everyone
Stu & Clara Blair, Cincinnati, O.
Greg, great new addition. It’s never large enough. The car looks great. Stu, I bet you find that the old brakes will have functioned better than the new ones. It takes about 2000 miles to get them broken in. The car looks good. Hope to see you and the car this summer in Rhode Island. Merry Christmas to all. Thanks for the posting.
My ’35 845 will take a little longer than winter. The goal is to get the front axle re-installed so I can roll the PA off the lift and put the Christmas tree back into its spot in the attic above the Packard in January.
Greg,
Anyone with a German Shepherd, a Pierce AND a backhoe is King in my book. Man’s best friend, and two of the best toys in the universe make for a happy guy! Congrats.
James,
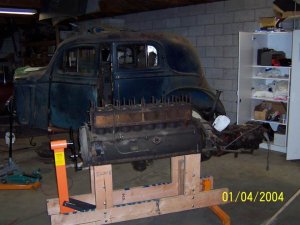
If that is your Pierce engine in the foreground, you may want to support the front ASAP. That’s a lot of weight on a few threads. I made the mistake of doing that with a lowly 312 from my ’56 Thunderbird, and it caused the rear cylinders to get out of round. The 312 only weighs in at 600 lbs or so. That straight 8 is almost twice that, and has a greater moment around the rear of that engine. Just a thought…
Bob actually what you can’t see in the photo is the front engine stand, I put together a double ender engine stand from two “cheap and cheezy” engine stands. It is pretty awkward but works. Attached is a picture when I first pulled the engine out almost ten years ago before putting it back in because I moved to a different house. The wood supports are needed to support the engine before the transmission comes off allowing the aft engine stand to be attached. I have used the rear engine stand by itself for 383 and 440 Chryslers in the conventional way, but never left them just cantilevered off the mount when fully “dressed”. Thanks for the concern!
Jim
My Winter Project started out pretty easy. I am re-finishing the intake and exhaust manifolds on the 1931 Model 43. It just go more interesting today. When the Intake manifold came back from media blasting to remove the remains of the porcelain, a thin spot in the casting had perforated…leaving a hole. This is the area where near the flange where there is clearance in the casting for the “D”” shaped clamp plates. Don’t need a huge vacuum leak like this! I am off to the cast iron welding shop tomorrow for the repair.
Happy Motoring and Happy New Year!
Chris”
I would be very careful welding that intake. They are going to have to heat it to 900 degrees to weld it, and between the length and how the weld will pull on the intake runner, it will warp. The question is how much, and if it will crack when cooling. In that location I don’t have any good advice on what to do. For the cost of welding and machining, then taking a chance of cracking from thermo cycling, I think I would just find a good intake. They are fairly common and should prove not too difficult to locate. One must wonder if it had a leak before you took it apart. Unexpected surprises like this can sure ruin your winter project! If you do get it welded please post some photos. Thanks for the project posting, Ed.
That’s a pretty big hole! Personally, being a “function over form” guy, I wouldn’t risk a rare manifold with welding that has a high risk of creating more problems than it solves. An intake manifold only has to resist about 12 psi vacuum max, on the same order as the pressure that an .032 thick aluminum skin resists keeping a 5ft diameter light business jet fuselage from exploding when pressurized. My first idea would be to use a thin strip of .016 aluminum or even thinner .012 stainless glued with high temp aircraft fuel tank sealant (used to be MIL-8802) to seal the leak. I think it would be pretty innocuous appearance wise after painting black to match the porcelain. Apologies for second guessing, as they say, free opinions are worth what you pay for them!
Jim
You may release a sleeping tiger if you try to weld that unit. How about some JB weld. The intake manifold does not get too hot and the epoxy may be enough. Don’t reporcelinize but use carbon fibre type paint.
Chris, have you made up your mind on how to fix the intake manifold?
For what its worth, and for other potential repairs, I looked up the numbers for high temp aircraft fuel tank sealants mentioned above.
The MIL-S-8802 spec Class B is available as a PPG aerospace product number PR-1440 Class B. “Class B” is a thixotopic paste (thick and doesn’t run) polysulfide that cures to a dark grey rubbery consistency with very high adhesion. It is used for aircraft applications exposed to hot fuel (oil as well) to 250F continuous 275 intermittent. That temp range should be adequate for an intake manifold, but there is an alternate formula PR-1750 Class B good for intermittent excursions to 360F. Peak temp on an intake manifold would most likely occur after shutting down on a hot day and heat soaking from the exhaust manifold. I would prefer the polysulfide over epoxy adhesives for repair because it is more flexible over time and better able to accommodate the flexing from the manifold’s expansion and contraction with heat. A thin steel “Band-Aid” patch would probably be better than aluminum in order to better match the thermal expansion rate of the cast iron.
Companies supplying aircraft repair supplies should have it, my distributor is Bergdahl Associates if you want to google it.
For using in fuel tanks, I don’t how resistant it is to alcohol – will try to find out as I will want to use it in my future fuel tank screen.
I used PR-1440 very successfully (still works 30 years on) on a number of items including sealing a cracked cast aluminum oil pan. A retired chemical engineer from the Mare Island Naval air repair station put me on to it.
Hi Guys,
I really appreciate all the ideas and suggestions. Unfortunately there were also a few cracks in the exhaust manifold…so I really have 2 cast iron casting issues to deal with. With the exhaust manifold also needing repair…I really need a permanent, high temperature repair.
The exhaust manifold cracks radiate from 2 of the mounting holes in the heat riser housing. (see the new picture)
I took both manifolds to a specialty welder that had previously done a beautiful repair on the cast iron cylinder head for this car (this was the subject of a previous feature article on the PAS Website). Their process clamps the part to a fixture to help keep it from warping, then the whole works goes into a large oven and is slowly brought up to proper temperature. The cracks are welded using cast iron filler rod and a gas torch, then the whole assembly is allowed to slowly cool in the oven by decreasing the temperature over a 12-16 hour period. They were pretty confident that they could successfully repair these and showed me some Packard manifolds with similar issues that had already been repaired. They also do the secondary machining in house.
I am pretty sure that these are the original manifolds for this car, so in the interest of preserving these hard-to-come-by parts, I am going to try and get them repaired/re-coated/re-used. I will do another article with more details to provide the info for the members.
At least this is Plan A.
Stay tuned. And Happy Motoring in the New Year!
Chris
