- Home
- About Us
- Join/Renew
- Member Benefits
- Member Pages
- Log In
- Help
- Museum Store
I think that is a bit strong. The Pierce specs claimed max 160 and 175 bhp occurring at 3400 rpm which I calculate at 247 and 271 ft lbs respectively. The maximum torque would normally occur at a lower RPM than max bhp. Based on test dyno data of a reasonably similar engine of the same era I would expect max torque to peak somewhere in the vicinity of 1800 rpm at about 275 and 305 ft lbs respectively. Many years ago I recall someone found some dyno data of a Pierce and it was published in the PASB, but I think it was an Eight and I haven’t been able to find it again since. I remember it was a bad copy and very hard to read!
Jim
I have no idea why my picture above is upside down!
Jim
Paul, A photo would be great, thanks. Based on your comments I suspect I have the direction of the outlet line on top of the fuel pump wrong, it should be coming outboard towards the hood rather than forward. In retrospect it was pretty dumb wondering why the line took the kick up towards the manifold, it should have been turned 90 degrees.
Greg, getting the fuel line over to run fwd along the hood ventilation doors should be ideal. The air coming out of the radiator should roll across the fuel line on its way out when the doors are open. That air is about 140 to 150 degrees, which is actually cooling when the fuel evaporation problem is generally happening with the fuel being heated in the range of 150 to 180. The exhaust manifold goes way over 600 degrees and is probably heating the fuel pump and line via direct radiation more than convection. The fuel line probably shouldn’t be insulated along that run forward as you are trying to use the 140 degree air to cool the fuel line, whereas insulation will block the cooling effect and absorb more radiation heat from the hot manifold. The insulation will absorb more radiation than the copper line.
I would avoid having the fuel line running back to the firewall. The cooling air coming out the radiator is mainly going to flow aft and down over the engine and manifolds then under the car as well as out the hood ventilation doors leaving a zone of air next to the upper firewall trapped by the hood being heated by the 200+ degree engine surfaces and much hotter exhaust manifold. That air is going to be pretty dead at low speed and idle, and perhaps turbulent but with no definite flow path out at cruising speed, meaning it will be hotter than the air in the forward engine compartment.
Jim

I don’t see if it has silicone in it as a protectant/rejuvenator a la ArmorAll. If it does I would worry about overspray onto paint as it can cause nightmares when repainting – moon eyes even if sanded and prepped to bare metal. Might mask or apply by cloth instead of spray if in doubt.
Jim
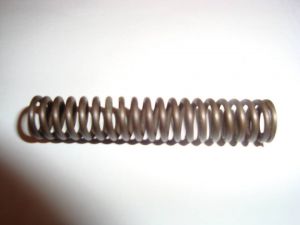
Bruce, I measured the oil pressure regulator spring on my ’35 845 Eight as follows:
wire dia – .063
OD .405
ID .275
length – 2.12 uncompressed
20 turns total
10 turns/inch
solid ht approx.26
Calculated spring paramters
k = 31 lbs/in
Mine had a corrosion pit that I worried would fatigue and cause the spring to collapse, so I found a close substitute from Lee Spring. They had a 10 minimum quantity to order and I currently have 8 on hand if you want one (no charge).
That spring is not a perfect dimensional replacement, is slightly longer and I added a .125 thick shim washer to get the the same cracking pressure.
I think a broken oil spring could possibly give you valve clatter since it would bypass a large amount of oil flow from the oil galleries that feed all the bearings and the lifters. The lifters are sensitive to the amount of flow reaching them as they have a tight clearance that is constantly leaking. I chased a tapping lifter that had .001 more clearance than the other 15.
Jim

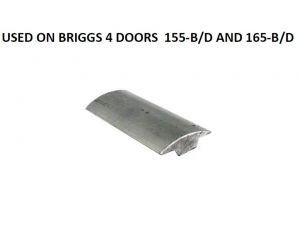
Tony, the Model A lead looks like a winner. Snyder’s Model A catalog shows several different strips that were used but I this one used on Briggs bodies looks like a good candidate. Snyder’s has instructions and pictures for installing this strip including pictures showing it bent to the tight radius curve.
can anyone say if the original P-A strips look like this cross-section?
Thanks, Jim

I’m a bit slow, just realized that the nail is driven first and the ball is peened in on top of it. So I guess the drill – pun intended- is to drill the holes in the strip, drive the nails and punch them under the surface then pound the lead ball in on top? Do you do a countersink in the hole first?
Thanks, Jim
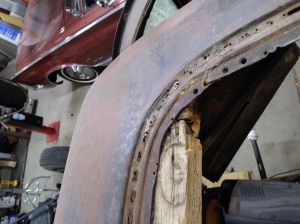
Thanks Jim and Greg, that explains it but more questions. I should look in the PASB’s I guess, but meanwhile…. Looking at Restoration Supply their catalog lists half round and shallower half ovals in various sizes in brass aluminum and steel. I assume one of these -brass or aluminum – is soft enough to bend to the tight radii in the corners (see picture).
Is the oval pre-drilled and countersunk to put the lead ball in before driving the nail? seems pretty tricky trying to drive a nail through a round ball!
Jim

Forgot to mention Bill, these pieces don’t have any laminations, they are solid pieces finger or lap jointed. There are a couple spots where there is a tongue in groove joint to add width locally.
I have been using Smiths epoxy rotten wood replacement resin in places where the rot is localized. The stuff is a bit challenging as it takes a week to cure and is so thin that it just drains through any leak path, so I have to be ready with drop cloths to catch leaks that can end up coming out a foot or more from where it is applied, even after sealng the area as best as I can.
Jim
Most of the wood in my sedan is still good but some bits like this aren’t. There is too much rot in the picture frame to fix, and some time in the distant past I think a couple of bows must have been replaced and they cut through the right longeron in two places to remove them. They put the piece back in place and spliced the resulting butt joints with wimpy perforated steel straps with only one screw on one side. Not the best structure! Actually I would like to know how they managed such a clean straight cut with the wood in place! I use a Dremel multi tool to make straight plunge cuts like that.
The finger joints of course are all bad and and there are a lot of them. I think that was done to avoid wasting a lot of wood cutting out the three dimension curve shapes from long straight boards. Years ago my father advised me that finger joints need really excellent tooling to make good structural joints, and probably can’t get there on a one-off hobby level with all the 3 dimensional angles they are cut too on these curved bodies. I plan to use long thick boards (ash) and not break and join them along the length at all. Less complicated and clearly better structure. Function over form.
When I get the new ones cut out I’ll post some pictures – might be awhile!
Jim
My experience with 30’s Packard made me a believer in the halogens. On my ’36 Packard I redid the reflectors with the UVIRA aluminized(?) glass coating and ran original 32/32 cp bulbs. The light was marginal. I then found some 50/21 cp bulbs, which I believe were illegal in many states at the time as being too bright for oncoming traffic – considered almost bootleg. The generator couldn’t keep up with two 50 cp’s so for many years I ran a 50/21 on the left and 32/32 on the right which the generator could just keep up with. I scavenged the swap meets to horde 50/21 CP bulbs. Then the halogens came out and what a difference. They put out the equivalent light of ’60’s era sealed beam and the generator could keep up. I have actually had oncoming cars flash me in unhappiness when I haven’t dipped my beam. Most of the time I think even the halogens on high beam aren’t really as glaring as modern lights, so it is a bit rare to get flashed!
Jim
My mind or the catalog?
Jim
Amongst the 16″ tubes being produced there are various stems, some come with a TR13 which is designed for a .53 rim hole and requires a bushing when used with a wheel using a larger .625 hole. The Firestone catalog states: “B6 bushing must be used with a .625 rim hole or valve failure will result”
When I picked up my tubes I expected them to be the TR13 but upon inspection were TR15 valves for the larger .625 hole, so the bushing wasn’t needed but Schwab had them in stock had they been required.
Jim
I picked up 7.00R7.50LR16LT Firestone branded tubes (probably still made in China) at the local Les Scwab dealer (and took them to a different installer). Firestone catalog lists this tube as fitting a number of 17″ radial as well as 16″ wheels. One I saw source says radial tubes can be installed in bias but tubes for bias can’t be installed in radial.
If anyone actually got some interest in manufacturing original type tubes, I still have the 1935 heavy safety tube in my garden shed for reverse engineering, couldn’t bear to part with it. Doubt if anyone is willing though!
Jim
A mind is a terrible thing to lose – I can’t locate my valve catalog.
Jim
Thanks to all.
I really appreciate that there are companies supplying the wide range of low production antique tire sizes, however it is a bit frustrating if they know the flaps and tubes they recommend have problems.
It was probably covered a few years ago, but the original tubes were much more robust. 25 years ago when I needed to get tires on my Pierce the installer pulled out the old tubes. He was a bit of a tire nerd and told me one of the tubes was probably original as the Goodyear symbol on the side was a style discontinued ca 1936. That inside diameter that rides on the inside of the wheel was semi-rigid,molded somewhat to the shape of the wheel and perhaps 4 times thicker than the outer part of the tube. It was also a safety tube with a tube within a tube to not run flat if the outer tube looses air. I don’t know if P-A supplied these as original equipment or perhaps it was a premium tube added after a flat ca 1936. Too bad we can’t get those!
Jim
Thanks, I think that confirms the size I found before and others having the same issue!
Jim
I have some valve catalogs somewhere, if I have the dimensions I could try to find some more modern (less old?) NOS valves that could be adapted.
Jim
Here is a picture of one of my ride control valves and an intact crush washer. I sent the leakers to Apple, we’ll see how that works out.
My’35 has Lovejoy shocks that still have the adjustment valve on the bottom, it is manually adjustable on the shock but didn’t have the levers and hookups to do it remotely from the dash. I have the same problem, the seal around the adjustment shaft weeps on two of them. Apple hydraulics quoted $80.00 each to rebuild (just the adjustment valve seal).
It appears the same shock was used in some Cadillac’s and a cross-section appears in the 1948 MoTorS manual.
I also had a cracked crush washer on one that was causing a leak. I couldn’t find an exact match for that crush washer and am hoping Apple has them.
Jim
