- Home
- About Us
- Join/Renew
- Member Benefits
- Member Pages
- Log In
- Help
- Museum Store
Looks almost identical; at any rate thanks for the lead.
I was offered one nos in the box, $325; had to think about that a while.
Not an expert but I would consider that Pierce-Arrow may have bought either the latches or the entire cover from a vendor, and there may be similar ones used on other Cars.
Ha! That’s my official Rolls-Royce Owners’ Club cup; it won’t hurt you (much; at first…).
What a beautiful little engine and a great find! This engine is part of a historic chain of engines of the De-Dion-Bouton family.
There was a Motorette participating in the London-Brighton Run in 2015 when I was there. Beautiful little Car.
Keep sharing!
RR
I laughed out loud when I saw this one; you gotta have a sense of humor!
I bet someone long ago said “There! I fixed it!”””
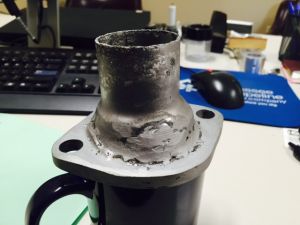
Check out my Car’s thermostat housing, post-glass bead cleaning: no aluminum here. It appears to be made of at least three pieces of steel, one of which is a length of exhaust tubing, welded (is that a weld?) together.
I sent a note to Wayne Hancock, about the replacement he is said to offer.

The thermostat I removed was made by Waxstat in England, setopoint is 86C or 180F.
The Car Quest 30116 seems to be about 167 F which seems suitable for something old; I wasn’t having temp trouble before so I don’t know if it makes a significant difference but what would you use: lower temp or higher?
This unit cross-references to a common Mercedes-Benz application and provides a block off on the inlet side; seems the block off would simply do nothing when used in the Series 80 head. M-B 1152000315; 1162000015; 1162000215; 22031775; and a lot of others. For the Mercedes, the setpoint is 167F
We have some large-bore engines (14-18 inch) which have drilled passages and coolant flowing to them via an exterior manifold, to direct more cooling to particular spots: exhaust seat areas and prechambers, usually. They work .
Photos of restored Cars I have taken show regular nuts. That’s what I am using for now.
Good ideas, Fellows. I did torque all the other studs anyway, and they all went to torque with minimal movement; additionally each one will ring if tapped on the side with a small wrench. For some reason (age? 90 years…) this one turned loose at some time in the past, since the overhaul circa 2004.
Are the correct head nuts just nuts? I was not planning to use acorn nuts; are they correct? I know the nuts and washers I found on my Car are zinc-plated hardware-store items. I was planning to use hardened washers and nuts, plain or phosphate finish, from a professional source.
You are right about the fits. At work we run into a lot of studs with class 5 fit which were never intended to be removed. You have to be careful when replacing with class 3 so we use gauges.
The Timesert-type repair is what we typically use at work; the bushings are made to order, not commercially available, but they have the strength of the original and we use them in critical applications (i.e. pressure).
Enjoyed; thanks for sharing.
Hard work indeed; don’t forget all the hard work and sacrifice that came before us: another reason to preserve fine Pierce-Arrow Cars!
Turns out the stud looks good; there was thread sealer or some similar substance in the thread root; cleaned up great with a die.
Ordering a gasket from Olson’s and the Timesert is on the way.
Thanks!
Greg, the stud looked pretty good other than the threads damaged by pulling so I suspect the block rather than the stud is the root cause. The engine in my Car was rebuilt after the PO bought it and the threads is this spot were maybe already marginal and just let go. It wasn’t at all tight when I first put a wrench on it. Every other one was quite tight and barely moved during the retorque.
Timesert: will use this. Thanks!
Just made our reservation; can’t wait!
I like your colors; I think it would look great with a black top and interior.
“Old”” gold to bronze fine lines?”
No jump seats because there wasn’t room due to the close-coupled design, I suppose.
Lesson I learned from this: either a credible story hopefully with receipts documenting engine-transmission-mechanical work at some time in the past are available; alternatively a “heavy” inspection; i.e. oil pan off for a look; or else a suitably discounted price.
It is entirely possible to own a nice car for years, hardly ever drive it, and be completely unaware of the internal condition of things. I’m OK with that until we start talking purchase price.
Thanks, Jak. In my opinion my jack would work better if it gripped both sides of the rim: it seemed prone to slip out of place at each critical moment. Nevertheless I was able to get the rim together by jacking it as far back in place as I could without the jack slipping out of place, then by using a large screw driver and a couple bumps with a hammer I snapped the rim back in place. The rim had a heavy Cotter pin in the latch; I wonder if this is the correct lock for the rim but it seemed sufficient at least.
The new tire is pressured up and I plan to use the new tire on the right-front, taking that tire to the spare and rotating the other three.
Thanks, Greg. I did get it together exactly as you suggested: with a very little levering. You are right about the potentially “explosive” nature of the rim jack.
I am not a risk-taker, and especially for the first time I measure several times before I cut.
