- Home
- About Us
- Join/Renew
- Member Benefits
- Member Pages
- Log In
- Help
- Museum Store
Yes, that is my problem. I let the brake fluid soak overnight with no improvement. Then let it sit in lacquer thinner for the day hoping to just dissolve it to some degree. No luck except finally got the back rear piece off. Now I am breaking the glass to remove the rest I am trying to avoid bending the frame too much. I will use an intact frame with glass to create a pattern for the glass and undersize it slightly, and your advice to install the weatherstrip in the outer frame first is good.
Bill I found another youtube on the wintergreen oil probably by the same guy where he did a test of five different solutions over several weeks – ATF, brake fluid, hot water + wintergreen, 3/1 alcohol/wintergreen and 5/1 alcohol/wintergreen. The last was the clear winner. I do have a few original rubber parts (door bumpers) that are in surprisingly good shape that I will do the wintergreen oil treatment to. The Steele repro door bumpers I put on my Packard 30 years ago still look brand new and really scream out they are repro. I think my Pierce originals revitalized will look better without paying Steele’s big prices.
Thanks, Jim
No they aren’t sealed, the tubes are open at the top just like the K-S fuel gauge. The tubes were made from glass eyedropper tubes sealed at the bottom by melting the glass tip with a torch.They are in a frame that keeps rain from getting in when left outside.
The temp gauge is sealed I believe.
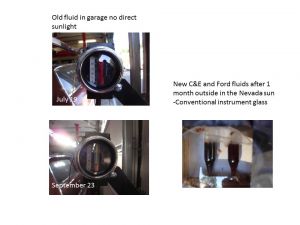
I have a total of 3 samples each from the two vendors and the 3 pairs are behind regular glass, 99% UV filtered glass and a UV filtered computer eyeglass lens. the idea was to see if UV filtering would extend the life of the color, but to date none have faded so no way to tell. If the weather ever gets to being like summer I will put them out in the sun again.
The colored bead inside is a great idea but the K-S fluid is some high density chemical that can be corrosive, so not sure what material – including color- a ball could be made from and survive. Has anyone done this?
Jim
per a previous thread: I did an experiment a few years ago trying to determine how fast the K-S fluid would lose its color and if the fluid from different vendors lasted longer. I purchased new K-S fluid samples from both vendors (Ford and Classic) and put them in glass dropper tubes and set them directly in the Nevada sun for the summer. Some had UV protective glass in front of them. None of them had turned color by the end of the summer, and to date still haven’t turned sitting around in my garage.
Oddly, however, the fluid I had in my K-S fuel gauge for the test of my system was bright red for the test but after a couple of months in the garage without direct sunlight it suddenly turned light amber in the space of a week or two. That fluid was from a vial I had bought over 20 years before and had been carefully kept in its black light blocking packaging in a closed box the entire time until put in the gauge for the test.
I think it is a combination of age and light, not just the light exposure alone.
The best chance is buy fresh fluid and it should last a few years. I may put my test samples back in the sun for the summer to extend the test.
Jim

After 37 years with J.C. Taylor I finally gave up this year and switched to Hagerty. Taylor no longer has any local brokers in my end of the state, and my new “brokers” became a succession of other national insurance companies – Wells Fargo, then HUB with no contact information to make policy changes. The total premium was less with Hagerty even though I added an additional collector car to the policy. My local Allstate agent was able to be my Hagerty broker.
Jim
Dave Murray responded to my question: “I believe the bracket for the wing window operator is the same. I have both a 35 and a 36 and have not noticed any difference although I have not examined them closely.””
He also notes that he may have some good originals.
Jim”
I have to take back my criticisms of the Firestone 7:00-17 tires steering. I just completed an 800 mile tour with them and they behaved just fine – no more tramping than the Lesters. I guess I was overly sensitive on the first drive as it was done on I-80 which has fairly deep ruts from all the truck traffic and no bias ply tire does well in that scenario.
—and the tubes were the 700R750R16LT truck tire tubes mentioned above.
Jim
I had no issues with the Lester’s, just wore them out. Tubes sold with 7.00-17 by Coker are too large – previous thread. Tubes sold with 7.00-19 may be okay.
Jim
I ran into the same problem on my ’36 Packard years ago. The sizes for 7:00-17 are not consistent. I originally bought Denmans that would not fit in the sidemount covers. I then bought a pair of 6.50:17, they were significantly smaller and I had to stuff foam rubber around them to keep the covers in place. I discovered that Lester’s 7.00:17 is slightly smaller and has a somewhat narrower tread width. I think the Lester’s dimensions correspond to the original OEM tires. The current Firestone 7.00:17’s are larger.
A side benefit to the Lester’s – at least on my Packard – were the car handles significantly better with the narrower tread width – much less “tramping” kicking the wheel to follow ruts. There always seems to be a psychological bias that bigger is always better and 7.00-17’s get replaced with 7.50:17’s. Not always the case. Unfortunately I didn’t realize the Firestones were wider than the Lester’s and I replaced my tires last year with the Firestones. Now it is rut-following again like it did with the Denmans – I wish I had bought the Lesters. They are apparently still available at Universal, but no longer from Coker.
Years ago Coker published a catalog that gave the diameter and tread width dimensions of all their tires. On the Universal site the diameter dimension isn’t given so it might be worthwhile to check with them to confirm the Lester is still smaller. It would be surprising if it isn’t from the same mold as before though.
Jim
The worms and sector gears are handed left and right but the same front vs rear. On my 845 Club the shafts that come out of the worms are different, the rears have a little universal joint and fronts don’t. The only consequence of putting a left worm/sector pair in a RH window assembly is the direction to open or close will be backwards.
There are three weak spots that fail in these units from over torquing to close or open with a tight weatherstrip. I think the most common is stripping out the sector gear teeth, hence the repros from Irv and Dave, the second is breaking the cast bracket, and the third I discovered the hard way is stripping the splines of the sector gear that fit to the window shaft.
It is important to make sure that the weatherstrip doesn’t fit too tight and overstress the assembly when closing or opening. Brave words, I haven’t gotten to the point yet of doing that myself yet.
Jim
Yes, after meticulously recreating the shallow angles of the first prototype parts I realized that all four of mine, left/right front/rear were all twisted differently but had the same casting number. I do think they all got twisted from over torquing through the years. In the 34-35 parts book the only part that would seem to be describing these is the #772388 “Bracket, wing operator”, and the parts book lists 2 or 4 required per car (depending on whether it had rear wing windows or not).
I contacted Richard Anderson who reproduced these many years ago and his recollection was that the same casting fit all four positions.
So I think the question boils down to whether ’36-38 used the same. It appears that PAS does not have a parts book for ’36-’38, so if someone has one these from a ’36-38 handy that the casting number could be read from we would have the answer.
Thanks for any help! Jim
I am wondering if anyone can help with whether this fitting fits other Pierce-Arrows? I suspect it also fits ’36-’38 as the replacement worm sectors that Dave Murray reproduces are listed as ’34-’38 and I believe the doors themselves were basically unchanged.
Trying to interpret the ’34-’35 parts catalog I believe the Pierce-Arrow designation for the original part was #772388 “Bracket, wing operator”. that number does not appear on the casting itself (70302 is what is cast).
I will be placing an ad in the emporium and and would like it to reflect whatever models it will fit.
Thanks for any help, Jim
The motor mounts that have been supplied for the Eights are a standard rubber isolator that can be purchased from Mcmaster-Carr. The ones pictured are marked “70”, indicating they are probably very hard 70 durometer rubber. I bought a similar set for my 845 years ago, but what I believe were originals on my 845 were much softer 40 durometer. The load rating for the softer 40 durometer listed in the Mcmaster-Carr catalog is in line with total weight of the engine/transmission divided by the number of doughnuts. I vaguely recollect that these 70 durometer doughnuts were supplied for a large Caterpillar diesel. the doughnuts are available – cheap – in increasing stiffness/load ratings. The best match should be the load rating that somewhat exceeds the total weight of engine +transmission+freewheel + power brake divided by the number of doughnuts. I don’t know what that number is for a twelve, but may mean a 50 instead of 40 durometer. I think there may be a mark under the original bushings that indicate the durometer. Jim
I would modify some of these statements a bit. The issue with advanced spark is pretty much dominated by preventing spark knock (detonation, ping, etc). That is a function of octane number. When the Dept of Agriculture began doing nationwide surveys of automobile gasoline characteristics in 1936 the average octane number for summer gasoline was about 80 (approximating what the average would have been between the “motor method” and “research method” as posted on the pumps these days). Current regular is typically 87 octane which means it is significantly more knock resistant than the gasolines used in 1936, and spark timing can be advanced significantly over the entire range compared to factory spec. I generally advance spark about 5 degrees over factory. This will provide slightly more power and better fuel economy, more importantly perhaps it will reduce exhaust gas temperature and reduce the tendency for exhaust valve seat recession. It also reduces the tendency to overheat somewhat.
The somewhat increased pressure in the cylinder should not be any problem for the bearings except possibly if the engine is being lugged at wide open throttle at idle rpm, since at higher speeds the centrifugal force of the piston relieves the downward force of combustion.
You don’t want to advance the timing to the point where you ever hear any knock/ping/detonation, as this is the primary factor in cracking valve seats in side valve-in-block engines.
Ethanol in the fuel is not inert, regardless of compression ratio it will burn and create pressure. For our engines typically running rich – more fuel than air for complete combustion – it will probably increase maximum power slightly not reduce it. This is because it carries an extra oxygen molecule with it. The ideal air fuel ratio for pure ethanol is 9/1 compared to 15/1 for gasoline. Our pre-war engine carburetors are generally quite rich delivering well below 15/1. In addition ethanol cools the mixture more when it atomizes in the carburetor increasing the density of air going into the cylinder. The EPA forced many communities to add ethanol in the winter to improve combustion and reduce carbon monoxide emissions of cold engines running too rich. Paradoxically ethanol has less energy content per pound than gasoline, so fuel economy is a bit less. Ethanol creates other problems of course. Basically with ethanol blends you are pouring more fuel in which can deliver a bit more power at wide open throttle but increases fuel consumption.
Jim
I originally assumed that the castings twisting and breaking was simply due to windows being overstressed from tight or sticking fits into the weatherstripping rubber. However, in checking the fit-up of the new machined parts versus the original castings I found that they were originally assembled with a significant interference when attached to the large plate that holds the window regulators and door latches. This was forcing a significant load on the casting that was probably a big contributor to their failure. When re-installing the castings it may be necessary to open up the hole in the plate the bronze bushing goes through and redrill the attaching holes so that there is no load on the shaft and bushing when the plate is assembled. See the attached pictures.
Richard responded to my question on RH and LH and his recollection is that he reproduced only one casting design – not handed. I have since remade my machined parts to take out all the wonky angles so they would not be handed at all and did a fit check, they seem to be better. All the wonky angles seem to have been from twisting from being overstressed and not the original design. It appears that a single design is used for all front LH/RH and rear LH/RH. This simplifies the design and increases the production runs and reduces the costs. I have done a redesign of the part so it could be done as a single one piece aluminum CNC machining. It would not look like the original but should be significantly stronger.
I don’t know what years beyond ’34-’35 this piece would cover and what the demand might be.
Jim

Thanks to this post it reminded me I needed to get brighter taillight and stop bulbs for my Packard based on comments from others following me. I have ordered some LED bulbs to try that are 600 lumens. According to the source of all wisdom (the internet) candle power (or candelas) can be converted to lumens by multiplying by 12.57. Packard specified a 3 cp tailight bulb which would have only been 38 lumens. I have a stoplight bulb that was rated at 25 watts, and using a table converting incandescent watts to lumens indicates between 11 and 13 lumens/watt, thus my stoplight bulb would be about 275 lumens, so a 600 lumen should be a lot brighter – maybe too bright but the tailights have poor reflectors and are located away from the focus of the reflector.
I was operating 32 then 50 cp headlight bulbs before I switched to the newer halogens, so they would have been 400 and 630 lumens respectively. The newer halogens seemed a bit brighter than the old 50 cp, have the same filament location for the low/high beam focus and the generator can keep up with them (it couldn’t running 2 50 cp bulbs). I will stand pat with the halogen for headlights.
Jim
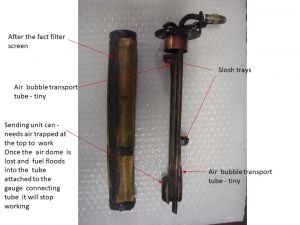
Ken, I am hoping others with more experience will post, since at this point I don’t have operational experience. I suspect that once the trapped air leaks out of the top of the lower can and floods the sending unit tube up to the level of gas in the tank that it would likely take a lot of driving before enough air is restored to get it working again, or even not start working even with a lot of driving if the surface tension of the fuel in the sending unit line prevents the air bubbles from rising in the small tube and purging the fuel.
There have been of course lots of PASB articles and posts on this problem through the years.
Like “Chauncey” I have no trophy aspirations for my Pierce, but enjoy the challenge of making stuff work again. We know they must have worked to a reasonably acceptable level when new, and maybe it was simply that they would have been driven regularly, had no varnish or sediments in the tank and had never been disassembled. My idea above of adding valves to the system to provide a means to back flow the fuel out of the sending unit will probably create more problems than it solves unless a dead certain seal in the valves and their connections can be achieved – I will be cogitating on that.
I did an experiment a few years ago trying to determine how fast the K-S fluid would lose its color and if the fluid from different vendors lasted longer. I purchased new K-S fluid samples and put them in glass dropper tubes and set them directly in the Nevada sun for the summer. Some had UV protective glass in front of them. None of them had turned color by the end of the summer, and to date still haven’t turned sitting around in my garage.
Oddly, however, the fluid I had in my gauge for the test of my system shown in the picture above was bright red for test but after a couple of months in the garage without direct sunlight it suddenly turned light amber in the space of a week or two. That fluid was one I had bought over 20 years before and had been kept in its black light blocking packaging the entire time until put in the gauge for the test.
I think it is a combination of age and light, not just the light exposure alone.
Jim
It occurs to me that perhaps it would be possible to get a KS fuel gauge working again that has stopped because it has lost its air charge from a miniscule leak after sitting for awhile.
Install a stop valve somewhere between the sending unit and the gauge and close it. Install a tee connection to the line between the sending unit and the new stop valve. The line coming from the tee will also need a stop valve. Blow air into the tee to clear the line and sending unit of fuel – might be able to hear it bubbling in the tank when it clears. Close the valve going into the tee while still blowing air into it. Then open the valve going to the gauge.
Of course the valves and their connections introduce a new source of potential leaks and could make the problem more frequent.
Jim
Bill, the CAD files are on their way.
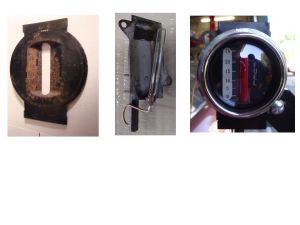
Peter, mine is the King-Seeley hydrostatic gauge. The previous picture shows the test I did to see if it would work off the car first. The two big problems as you know are getting the connections of the tube between the gauge and the sending unit as perfectly sealed as possible. On my test I immersed the sending unit in a jerry can of fuel and timed how long the column would stay up before leaking down. I got it to where it could last more than a week. I think some have soldered the connections or used sealant when making the connections, I didn’t want to do anything permanent for my test since I had to take it apart again to install on the car.
To keep it working on the car it must be driven periodically to slosh the fuel around. The whole complicated sending unit in the tank relies on the fuel sloshing around to fill the little trays that then drain down with trapped air down the tiny tubes and replenish the air trapped in the top of the can at the bottom of the unit. I don’t think the air gets recharged with a full tank or nearly empty tank so I theorize that 1/4 to 3/4 tank is probably best to keep it working. Of course if the tiny tubes get plugged with junk they won’t work either. This requires either a pristine tank with no sediment or a filter around the sending unit. I built a filter to surround the sending unit but won’t know if the whole mess works until I get the car on the road. I don’t think my filter turned out to be a very good design, it became a real kluge to get it to go down the fuel tank hole. With a couple years to mull it over I am thinking of redoing it. Instead of surrounding the entire sending unit assembly with a brass mesh, I am considering applying a fine mesh to the tops of the little trays themselves and a separate filter for the main fuel pick-up tube. It probably also needs a screen for the bottom of the can since it has a very tiny hole that lets the air bubbles get into the can. Mine was blocked with old gas sludge.
It is with some trepidation that I post the picture of my kluge. In my mind it didn’t start out this crude.
Jim

This appears to be identical to my ’35 845. I generated a CAD model of the facia markings for restoration if it would be of any help.
Jim

